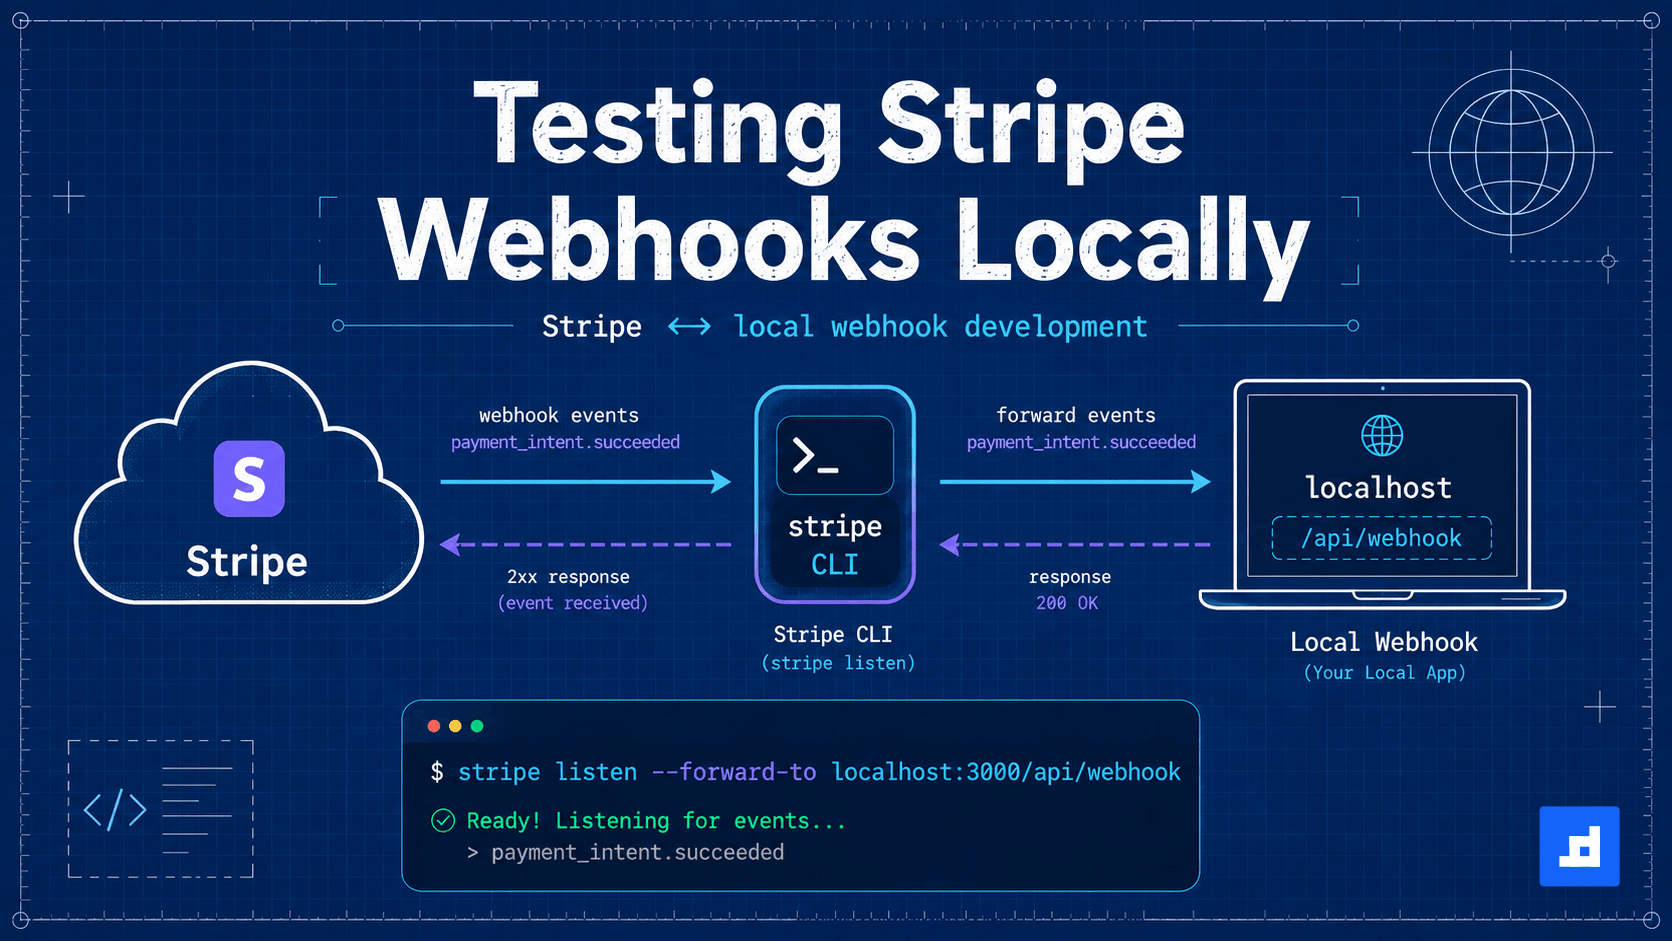
สวัสดีครับ บทความนี้จะพูดถึงวิธีการทดสอบ Stripe Webhook บนเครื่อง local กัน ปัญหาที่เจอบ่อยมากคือ Stripe ต้องการ URL เพื่อไว้ส่ง webhook ซึ่งเราต้อง deploy web ก่อนเพื่อส่ง event ให้มาหาเรา ทีนี้พอเป็น localhost เทสบนเครื่อง เราไม่สามารถรับ event ได้ ดังนั้นเราเลยต้องใช้ Stripe CLI มาช่วย forward event โดยที่เราไม่ต้อง deploy website แต่เทสผ่าน localhost ได้เลย
*Cover Image สร้างด้วย prompt ChatGPT
ปัญหาที่เจอ
ปัญหาคือตอน develop บน local เราเปิด server ที่ localhost:3000 ซึ่ง Stripe ไม่สามารถเข้าถึงได้
Stripe → ❌ http://localhost:3000/api/webhookวิธีแก้คือใช้ Stripe CLI ที่รันบนเครื่องเรา แล้วทำหน้าที่รับ event จาก Stripe แล้วส่งต่อมาที่ localhost ครับ
Stripe → ✅ Stripe CLI → ✅ http://localhost:3000/api/webhookStep 1 : ติดตั้ง Stripe CLI
ติดตั้งผ่าน Homebrew (macOS)
brew install stripe/stripe-cli/stripeตรวจสอบว่าติดตั้งถูกต้อง
stripe version# stripe version 1.27.0Step 2 : Login
ทำการ login เพื่อให้ Stripe CLI สามารถส่ง event ไปยัง webhook URL ของเราได้
stripe login
Your pairing code is: xxxxxxxxxxxxThis pairing code verifies your authentication with Stripe.Press Enter to open the browser or visit https://dashboard.stripe.com/stripecli/confirm_auth?t=xxxxxx
กด Enter แล้วเปิด browser เพื่อยืนยันตัวตนกับ Stripe account ของเรา ให้เราทำการ login stripe บนเว็บ
Done! The Stripe CLI is configured for <your-account> with account id <acc_xxx>หรือถ้าใช้ AI/LLM ลองเพิ่ม skills ได้เช่นกัน
npx skills add -y https://docs.stripe.comStep 3 : เตรียม Webhook Endpoint
ตัวอย่างง่ายๆ ของ webhook handler ที่รับ event จาก Stripe มีขั้นตอนหลักๆ สามอย่างคือ
- รับ raw body จาก request
- ตรวจสอบ signature ว่า event มาจาก Stripe จริงๆ
- จัดการ event ตาม type ที่เราสนใจ
เพื่อให้ง่ายที่สุด เราจะใช้ Express ไฟล์เดียวเลย ไม่ต้อง scaffold project อะไรทั้งนั้น
ติดตั้ง dependencies
npm install express stripe dotenvสร้างไฟล์ server.js
import 'dotenv/config'import express from 'express'import Stripe from 'stripe'
const stripe = new Stripe(process.env.STRIPE_SECRET_KEY)const webhookSecret = process.env.STRIPE_WEBHOOK_SECRET
const app = express()
app.post('/api/stripe-webhook', express.raw({ type: 'application/json' }), (req, res) => {  const signature = req.headers['stripe-signature']
  let event
  try {    event = stripe.webhooks.constructEvent(req.body, signature, webhookSecret)  } catch (err) {    console.error('Webhook signature failed:', err.message)    return res.status(400).send(`Webhook Error: ${err.message}`)  }
  switch (event.type) {    case 'checkout.session.completed': {      const session = event.data.object      console.log('Payment success:', session.id)      break    }    default:      console.log(`Unhandled event: ${event.type}`)  }
  res.json({ received: true })})
app.listen(3000, () => console.log('Server running on http://localhost:3000'))
สร้างไฟล์ .env
STRIPE_SECRET_KEY=sk_test_...STRIPE_WEBHOOK_SECRET=whsec_...รัน server
node server.jsสังเกตว่า route
/api/stripe-webhookใช้express.raw()แทนexpress.json()เพราะ Stripe ต้องการ raw body ในการคำนวณ signature ครับ ถ้าใช้express.json()signature จะไม่ตรงและ verify ไม่ผ่าน
Step 4 : Forward Events ด้วย stripe listen
ตอนนี้เราจะใช้ Stripe CLI มา forward event มาที่ webhook ของเรา รัน command นี้ในอีก terminal นึง
# Terminal 2stripe listen --forward-to localhost:3000/api/stripe-webhookจะเห็น output แบบนี้
> Ready! You are using Stripe API Version [2025-04-30.basil].> Your webhook signing secret is whsec_abc123xyz... (^C to quit)สำคัญมาก: copy ค่า whsec_... นี้ไปใส่ใน .env
STRIPE_WEBHOOK_SECRET=whsec_abc123xyz...ค่านี้จะเปลี่ยนทุกครั้งที่รัน stripe listen ใหม่ ดังนั้นถ้า restart CLI ต้อง update env ด้วยนะครับ
Step 5 : ทดสอบด้วย stripe trigger
ก่อนจะทดสอบ flow จริง ลองยิง event จาก CLI ก่อนได้เลย เพื่อเช็คว่า webhook handler ของเรารับได้ถูกต้อง
เปิดอีก terminal แล้วรัน เพื่อจำลองส่ง event checkout.session.completed
stripe trigger checkout.session.completedใน terminal ที่รัน stripe listen จะเห็น log ประมาณนี้
2026-06-10 15:30:00 --> checkout.session.completed [evt_xxx]2026-06-10 15:30:00 <-- [200] POST http://localhost:3000/api/stripe-webhook [evt_xxx]และใน server log ของเราจะเห็น
Payment success: cs_test_xxxถ้า response เป็น 200 แสดงว่า webhook handler ทำงานถูกต้องแล้วครับ
ถ้าได้ 400 หรือ 500 ให้เช็ค
- ค่า
STRIPE_WEBHOOK_SECRETใน.envถูกไหม - Server ของเรารันอยู่ไหม หรือ URL ผิด?
การเทส Stripe เราสามารถใช้บัตรเครดิต ตัวเทส ได้ โดยใส่ดังนี้
Card: 4242 4242 4242 4242Expiry: 12/29 (อะไรก็ได้ที่ยังไม่หมดอายุ)CVC: 123 (อะไรก็ได้)
สรุป
เราสามารถทดสอบ webhook ของเรากับ Stripe CLI ได้ง่ายๆ แค่
- ติดตั้ง Stripe CLI →
brew install stripe/stripe-cli/stripe - Login →
stripe login - Forward events →
stripe listen --forward-to localhost:PORT/api/webhook - Copy
whsec_...ไปใส่STRIPE_WEBHOOK_SECRETใน.env - ทดสอบด้วย
stripe trigger checkout.session.completed - ทดสอบ flow จริงด้วย test card
4242 4242 4242 4242
หากใครติดปัญหาตรงส่วนไหน สอบถามมาได้นะครับ
Happy Coding ❤️
Freelance
ต้องการคนช่วยพัฒนาเว็บไซต์หรือ Web App?
รับงาน Frontend, Backend, Web App, CMS, เว็บไซต์บริษัท, E-Commerce, และเชื่อมต่อ API สำหรับธุรกิจหรือทีมที่ต้องการคนช่วยพัฒนา
- Authors
-

Chai Phonbopit
Senior Software Engineer ประสบการณ์กว่า 12 ปี ด้าน Frontend: React, Next.js, Tailwind CSS และ Backend: Node.js, Express, NestJS ปัจจุบันสนใจ Astro, Cloudflare Workers และ AI Coding Tool