![[React.js] หัดใช้งาน Zustand เพื่อจัดการ State](/images/covers/bear.jpeg)
พอดีว่าผมห่างหายกับการเขียน React.js ไปพักใหญ่ๆ คือแทบไม่ได้เขียนโค๊ด หรือทำเว็บเลย ตั้งแต่ปีที่แล้ว และเพิ่งกลับมารื้อฟื้นใหม่ ก็ต้นปี 2022 ที่ผ่านมา ก็ได้ไปเจอตัว State Management ตัวนึงที่ชื่อว่า Zustand เพราะ ตัว Mascot มันเท่ดี หลังจากลองอ่าน Docs คร่าวๆ ก็รู้สึกว่า มันใช้งานง่าย สะดวกดี
จริงๆ นอกจาก Zustand มันก็ยังมี State Management อีกหลายตัวครับ ไม่ว่าจะเป็น Jotai, Recoil, MobX, Flux, Redux หรือแม้แต่ React Context API ก็ตาม ทุกตัว ไม่มีตัวไหนดีสุด มีข้อดี ข้อเสียต่างกันไป อยากใช้ตัวไหน ก็ตามสะดวกครับ และโพสต์นี้ก็ไม่ได้มาเชียร์ หรือเปรียบเทียบนะครับ
สำหรับบทความนี้ จะมาสรุปการใช้งาน Zustand เบื้องต้น เล็กๆน้อยๆ ซึ่ง ตัวอย่าง ก็นำมาจาก README ของทาง Zustand นั่นแหละครับ
- Zustand Docs - หน้าเว็บ Docs เนื้อหาเดียวกับใน Github
Install Zustand
ทำการติดตั้ง zustand ด้วย Yarn หรือ NPM แล้วแต่สะดวก
npm install zustand# หรือ yarn add zustandถ้าเราดูจากเว็บของ zustand ใน Github จะเห็นว่ามี ตัวอย่างง่ายๆ แบบด้านล่างเลย คือ
Create a Store
สร้าง Store ขึ้นมา โดยใช้ function create มี state ชื่อ bears มีค่าเป็น 0 และมี increasePopulation และ removeAllBears ที่เป็น function ไว้ set ค่า state
import create from 'zustand'
const useStore = create((set) => ({  bears: 0,  increasePopulation: () => set((state) => ({ bears: state.bears + 1 })),  removeAllBears: () => set({ bears: 0 })}))
ซึ่งถ้าใครอ่านแล้ว งงๆ ลองแยกเป็น 2 ส่วน ส่วน createStore และ ส่วน useStore แบบนี้ดู น่าจะเข้าใจมากขึ้น และไม่สับสนตรง callback function
import create from 'zustand'
// 1 - create get/set states.const bearStore = (set) => ({  bears: 0,  increasePopulation: () => set((state) => ({ bears: state.bears + 1 })),  removeAllBears: () => set({ bears: 0 })})
// 2 - create store.const useStore = create(bearStore)
Component
ทีนี้เวลาเข้าถึง state ก็ใช้ useStore(fn) โดยที่ fn คือ (state) => state.bears ก็จะได้แบบตัวอย่าง
function BearCounter() { const bears = useStore((state) => state.bears) return <h1>{bears} around here ...</h1>}ส่วนการ set ค่า ผ่าน function increasePopulation ก็ใช้ useStore() เหมือนกัน
function Controls() { const increasePopulation = useStore((state) => state.increasePopulation) return <button onClick={increasePopulation}>one up</button>}จะเห็นว่า ตัวอย่างมีแค่นี้ครับ เรียบง่ายดี ถ้าจะเปรียบเทียบแบบ setState() ปกติ ก็น่าจะประมาณนี้
function Controls() {  const [bears, increasePopulation] = useState(0)
  return <button onClick={() => increasePopulation(bears + 1)}>one up</button>}
const state = useStore()แต่ข้อเสียคือ มันจะ render component ทุกๆครั้งที่ state เปลี่ยน ฉะนั้น เลือกเฉพาะ state ที่เราต้องการ
const myState = useState((state) => state.myState)หลังจากอ่านไปแล้ว จะให้ดีที่สุด ก็ต้องลงมือทำเพื่อจะได้เห็นภาพ และเข้าใจมันมากขึ้น นั่นเอง
Create New Project
ลองสร้างโปรเจ็คขึ้นมาแบบเร็วๆ ผมเลือกใช้ Vite และเลือก React แบบ JavaScript ธรรมดา (หรือ TypeScript ขึ้นอยู่กับความถนัด)
yarn create vite
✔ Project name: … hello-zustand✔ Select a framework: › react✔ Select a variant: › react
ติดตั้ง zustand
yarn add zustandลองรัน Server ขึ้นมา
yarn devจะได้หน้าเว็บง่ายๆ ขึ้นมา ซึ่งสามารถกด button เพื่อเพิ่มค่า count ได้ ทีนี้ ก็เปลี่ยนจาก Default ที่เป็น useState มาใช้ zustand และตัว counter ต้องทำงานเหมือนเดิม
import create from 'zustand'
const useStore = create((set) => ({  count: 0,  setCount: () => set((state) => ({ count: state.count + 1 }))}))
export default useStore
ลอง import ไฟล์มาใช้ใน App.jsx และเปลี่ยนเป็น useStore
import useStore from "./store"
function App() {  // const [count, setCount] = useState(0)  const count = useStore((state) => state.count)  const setCount = useStore((state) => state.setCount)
  return (...)}
แต่ถ้าแค่ state แบบนี้ จริงๆ ไม่จำเป็นต้องใช้ zustand เลย แค่ useState ก็เพียงพอแล้ว จริงมั้ย 🤣
ลองคิดกรณีสมมติขึ้นมีดีกว่า เช่น ต้องมีการ ให้เก็บ State เป็น Global State เพื่อที่จะใช้ร่วมกันในหลายๆ Components หรืออย่างเช่น Parent Component กับ Child Component จะส่งค่า get/set ค่ากันยังไงได้บ้าง
สร้าง store ขึ้นมาใหม่ ใน store.js ผมตั้งชื่อมันว่า useCounterStore
import create from 'zustand'
const counterStore = (set) => ({  count: 0,  increment: () => set((state) => ({ count: state.count + 1 })),  decrement: () => set((state) => ({ count: state.count - 1 }))})
export const useCounterStore = create(counterStore)
เลยลองสร้าง component ใหม่ ชื่อ Counter.jsx ในโฟลเดอร์ components
import React from 'react'import { useCounterStore } from '../store'
const Counter = () => {  const { count, increment, decrement } = useCounterStore()
  console.log(`Counter:render`)  return (    <section>      <h3>Counter</h3>      <p>count : {count}</p>      <button onClick={increment}>เพิ่ม</button>      <button onClick={decrement}>ลบ</button>    </section>  )}
export default Counter
จากนั้น ใน App.jsx ก็ import <Counter /> มาใช้ โดยเป้าหมายคือ ตัว App.jsx จะเรียก function เพื่อทำการ setState และ getState ที่เป็น global state ร่วมกันกับ Counter
import logo from './logo.svg'import './App.css'import { useCounterStore } from './store'import Counter from './components/Counter'
function App() {  const { increment, decrement } = useCounterStore()
  console.log(`App:render`)
  return (    <div className="App">      <header className="App-header">        <img src={logo} className="App-logo" alt="logo" />        <p>Hello Vite + React!</p>        <button type="button" onClick={increment}>          Increment        </button>        <button type="button" onClick={decrement}>          Decrement        </button>
        <Counter />      </header>    </div>  )}
export default App
ทดลองเปิดหน้าเว็บ แล้วลองเปิด Dev Console ขึ้นมา เพื่อดู log เมื่อเรากด ปุ่ม เพิ่ม หรือ ลบ จริงๆ มันควรจะ render แค่ Component Counter ใช่มั้ย เพราะ State ของ Counter เปลี่ยน แต่ทำไม App.jsx มันถึงถูก render ด้วย ทั้งๆที่ไม่ได้ใช้ state เลย
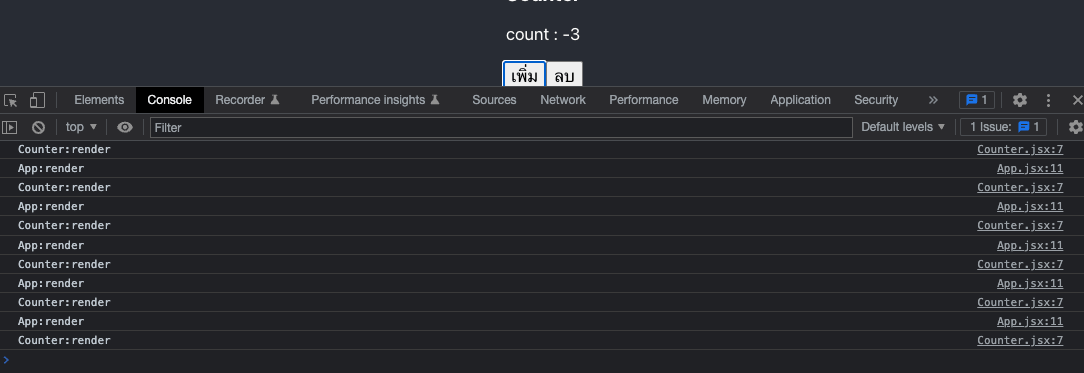
สำหรับใครที่สังเกตว่ามันมี log 2 รอบ (มันจะมีผลแค่ใน Development Mode เท่านั้น) สามารถเอา StrictMode ออกได้นะครับ
ReactDOM.createRoot(document.getElementById('root')).render( // <React.StrictMode> <App /> // </React.StrictMode>)คำตอบคือ ตรงนี้ครับ ที่มีปัญหา
const { increment, decrement } = useCounterStore()อย่างที่ Docs เขียนไว้ครับ ว่าเราไม่ควรใช้แบบนี้ เพราะมันจะมีผลเรื่อง Performance แน่ๆ มันจะ re-render ทุกๆ state ใน store
const state = useStore()วิธีการ ก็คือทำการ select state ออกมาแบบนี้
const increment = useCounterStore((state) => state.increment)const decrement = useCounterStore((state) => state.decrement)หรือถ้าเราต้องการ select หลายๆ state แบบ destructuring object เราสามารถใช้ shallow มาช่วยได้ แบบนี้
import shallow from 'zustand/shallow'
const { count, increment, decrement } = useCounterStore(  (state) => ({    count: state.count,    increment: state.increment,    decrement: state.decrement  }),  shallow)
กลับไปแก้ ไฟล์ Counter.jsx ให้ select state ให้ถูกต้อง ก็จะได้เป็นแบบนี้
import React from 'react'import shallow from 'zustand/shallow'import { useCounterStore } from '../store'
const Counter = () => {  const { count, increment, decrement } = useCounterStore(    (state) => ({      count: state.count,      increment: state.increment,      decrement: state.decrement    }),    shallow  )
  console.log(`Counter:render`)  return (    <section>      <h3>Counter</h3>      <p>count : {count}</p>      <button onClick={increment}>เพิ่ม</button>      <button onClick={decrement}>ลบ</button>    </section>  )}
export default Counter
และไฟล์ App.jsx ตอนนี้ เป็นแบบนี้
import logo from './logo.svg'import './App.css'import { useCounterStore } from './store'import Counter from './components/Counter'
function App() {  const increment = useCounterStore((state) => state.increment)  const decrement = useCounterStore((state) => state.decrement)
  console.log(`App:render`)
  return (    <div className="App">      <header className="App-header">        <img src={logo} className="App-logo" alt="logo" />        <p>Hello Vite + React!</p>        <button type="button" onClick={increment}>          Increment        </button>        <button type="button" onClick={decrement}>          Decrement        </button>
        <Counter />      </header>    </div>  )}
export default App
Persist State
นอกจากนี้ เรายังสามารถเก็บ Persist State เพื่อเก็บค่าให้มันอยู่ถาวรใน localStorage หรือ sessionStorage เพราะว่าปกติแล้ว state ใน React มันจะถูก reset ถ้าเรา refersh หน้าเว็บ แต่ถ้าใช้ Persist state มันก็จะไม่ถูก reset เพราะมันอ่านจาก localStorage ที่เราเก็บไว้
วิธีการก็คือใช้ middleware ที่ชื่อ persist ครับ ตัว syntax มันก็ประมาณนี้
import create from 'zustand'import { persist } from 'zustand/middleware'
const store = () => ({ myState: 0 })
const useStore = create(persist(store))
ตอนนี้ คือผมจะเพิ่ม color และ backgroundColor เพื่อแสดงผลหน้าเว็บ ให้มันมาอ่าน persist state แบบนี้
import { persist } from 'zustand/middleware'
const themeStore = persist(  (set) => ({    color: '#222',    backgroundColor: '#ff0000',    setColor: (color) => set(() => ({ color })),    setBackgroundColor: (color) => set(() => ({ backgroundColor: color }))  }),  { name: 'my-theme' })
export const useThemeStore = create(themeStore)
ต่อมาสร้าง Component ThemeControl เพื่อเอาไว้ set ค่า color นั่นเอง
import React from 'react'import { useThemeStore } from '../store'
const ThemeControl = () => {  const setColor = useThemeStore((state) => state.setColor)  const setBgColor = useThemeStore((state) => state.setBackgroundColor)
  return (    <div>      <div>        <p>          setColor <input type="text" onChange={(e) => setColor(e.target.value)} />        </p>        <p>          setBgColor <input type="text" onChange={(e) => setBgColor(e.target.value)} />        </p>      </div>    </div>  )}
export default ThemeControl
สุดท้าย ก็ import <ThemeControl /> ไปใน App.jsx จากนั้นก็เพิ่ม condition ให้มัน render style จาก state
import logo from './logo.svg'import './App.css'import { useCounterStore, useThemeStore } from './store'import Counter from './components/Counter'import ThemeControl from './components/ThemeControl'
function App() {  const increment = useCounterStore((state) => state.increment)  const decrement = useCounterStore((state) => state.decrement)
  const color = useThemeStore((state) => state.color)  const bgColor = useThemeStore((state) => state.backgroundColor)
  console.log(`App:render`)
  return (    <div className="App">      <header        className="App-header"        style={{          backgroundColor: bgColor,          color        }}      >        <img src={logo} className="App-logo" alt="logo" />        <p>Hello Vite + React!</p>        <button type="button" onClick={increment}>          Increment        </button>        <button type="button" onClick={decrement}>          Decrement        </button>
        <Counter />
        <ThemeControl />      </header>    </div>  )}
export default App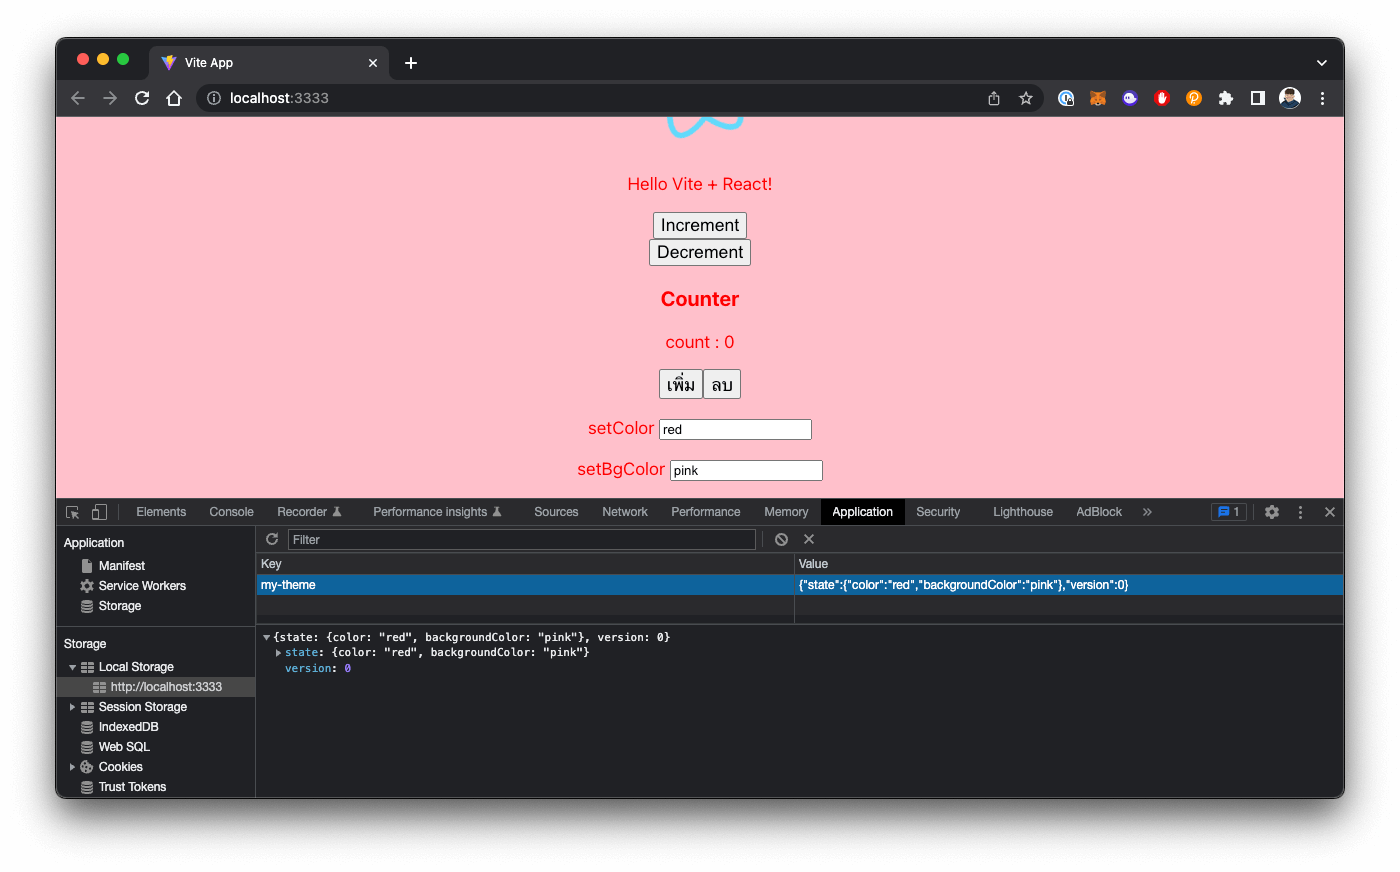
ทีนี้เมื่อเราดูที่หน้าเว็บเรา และลอง setColor และ BackgroundColor จะเห็นว่า หน้าเว็บมีการเปลี่ยนสีตาม state และค่า ก็ถูกเก็บลง localStorage นั่นเอง ทำให้ refresh ค่า state ไม่ reset
สรุป
ก็หวังว่าบทความนี้จะมีประโยชน์สำหรับคนที่สนใจ Zustand และการจัดการ State บน React.js แม้ว่า ตัวอย่างส่วนใหญ่ จริงๆ ก็คืออ่านจาก Docs นั่นแหละ และก็ลองนำมาประยุกต์ ปรับใช้งานดูครับ นอกจากนี้ ก็ลองอ่า Recipes เพิ่มเติม รวมถึง TypesScript Guide
Happy Coding ❤️
- Authors
-

Chai Phonbopit
Senior Software Engineer ประสบการณ์กว่า 12 ปี ด้าน Frontend: React, Next.js, Tailwind CSS และ Backend: Node.js, Express, NestJS ปัจจุบันสนใจ Astro, Cloudflare Workers และ AI Coding Tool
Related Posts