สวัสดีครับ วันนี้จะมาบันทึกการเขียน Smart Contract ด้วย Rust บน NEAR นะครับ เนื่องจากว่าผมลองไปทำ Challenge #2 - Hello World smart contract เล่นๆดู เป้าหมายของผมคือ เมื่อเขียนแล้ว ต้องเข้าใจด้วย ก็เลยพยายามเขียนจากเริ่มต้น และพยายามเข้าใจว่ามันทำงานยังไง ไม่จำเป็นต้องเข้าใจหมด 100%
ซึ่ง Requirement ของ Challenge ไม่มีอะไรมาก เพียงแค่ทำ Hello World App ด้วย Rust ขึ้นมา
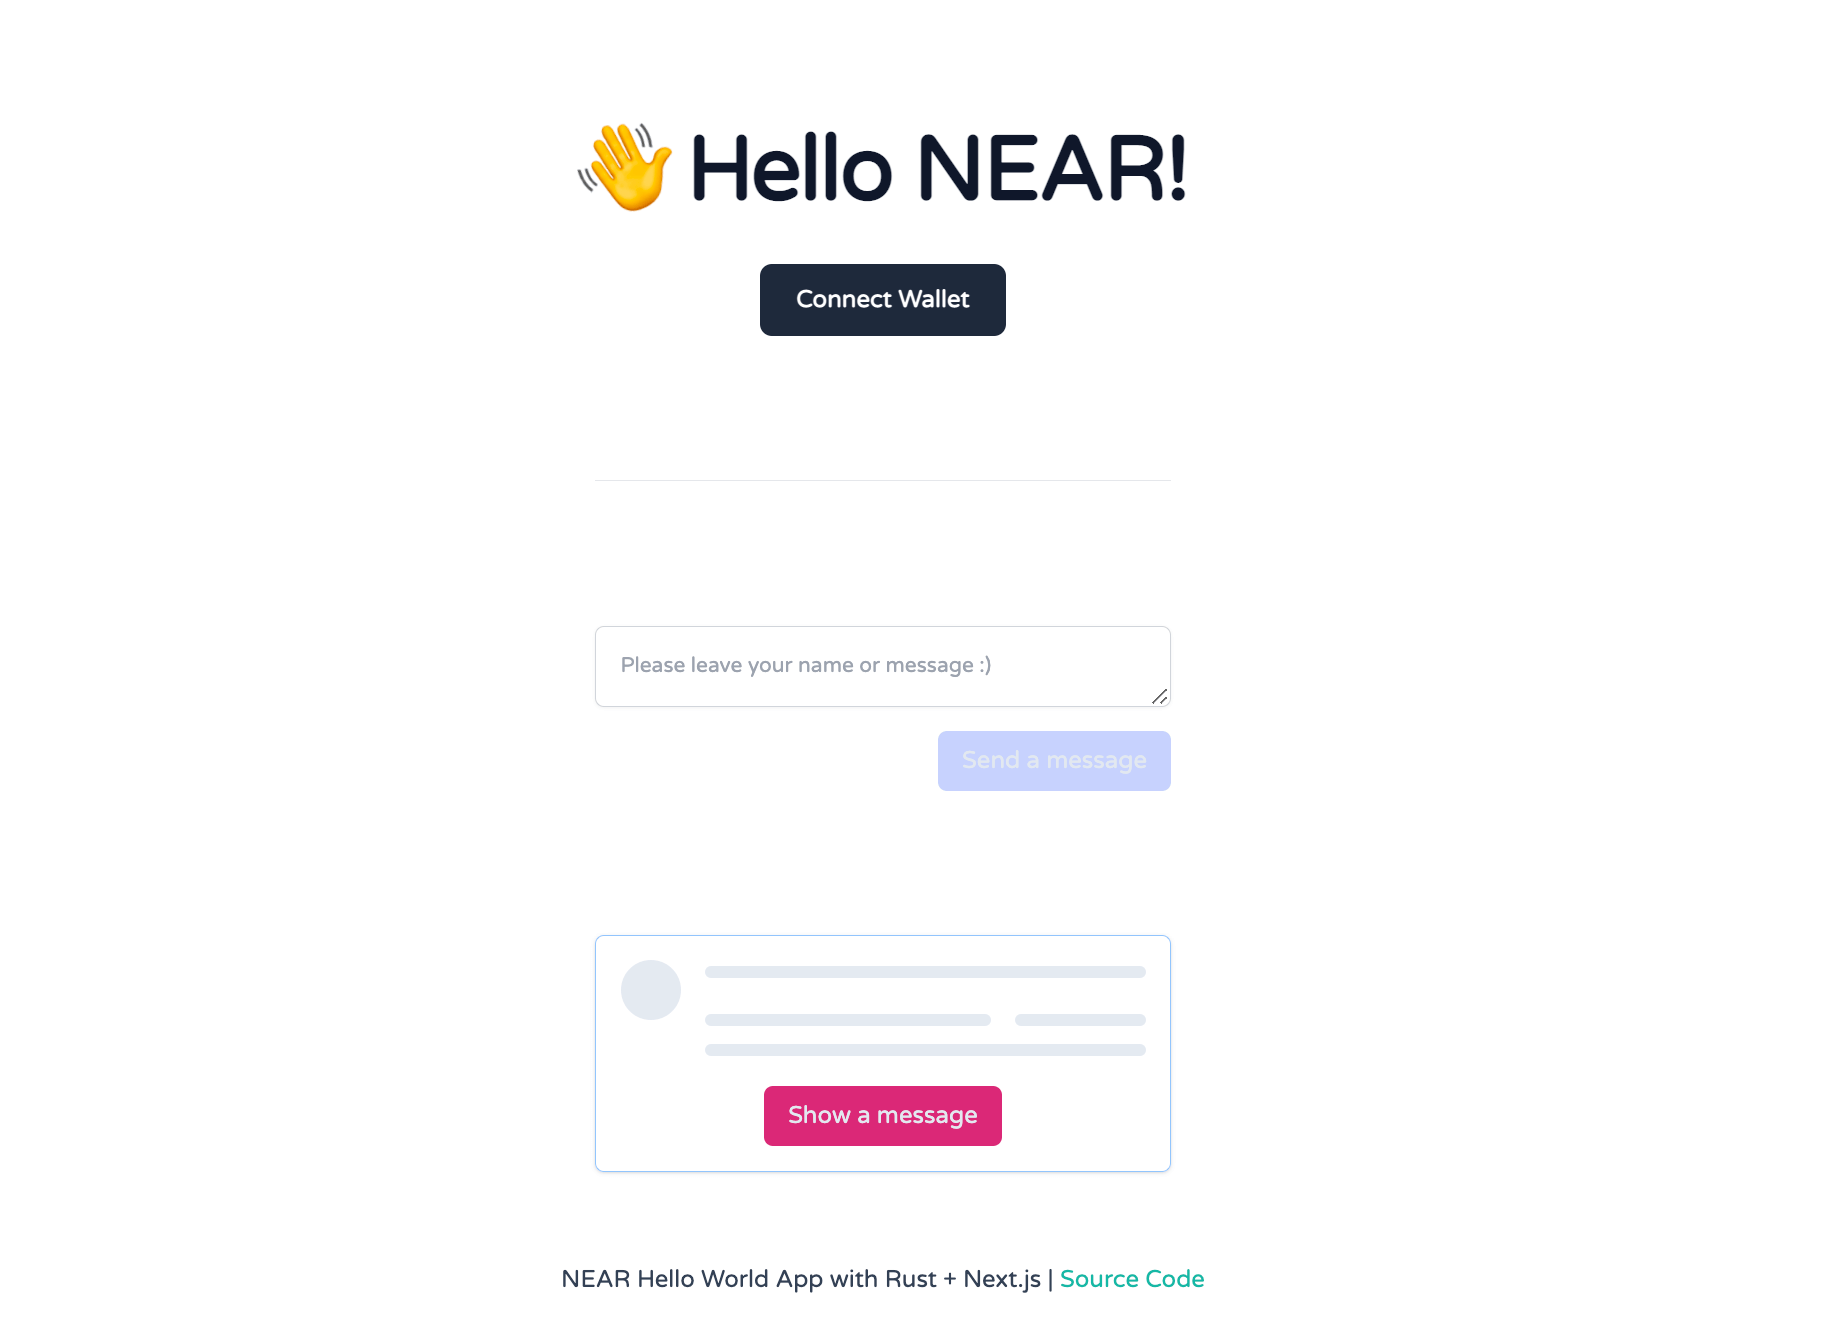
Build and deploy a frontend for your smart contract (GitHub Pages is the most simple option). The user should enter their name, call the contract, and see
Hello {name}!
ตัวอย่างส่วนใหญ่ของ NEAR สำหรับเริ่มต้นเลย ก็จะมี
- NEAR SDK - เป็น Tutorial
- Counter App - เป็น Rust
- Guest Book - เป็น Assembly Script
- Status Message - เป็น Rust
- Create Near App - มีทั้ง Rust และ AssemblyScript
ซึ่งผมไม่ใช้ Create Near App ในตอนเริ่มต้น เพราะผมรู้สึกว่ามันสะดวกก็จริง แต่ว่าโครงสร้างโปรเจ็คมันซ้ำซ้อน และเข้าใจยากไปนิด และผมก็อยากลองสร้างตั้งแต่เริ่มเลย มันน่าจะได้เรียนรู้จริงๆ มากกว่า
ผมเลยตั้งเป้าคือ
- ใช้ Create Next App สร้าง Next.js ง่ายๆ ขึ้นมา
- สร้าง Contract ด้วย
cargo newเลย - พยายามดู reference ต่างๆ แล้วลองเขียนขึ้นมา (จริงๆ ก็ใกล้เคียงกับ create-near-app แหละ)
- ส่วนที่ต่อ
near-api-jsก็พยายามดู Workshop API แล้วประยุกต์ใช้ React - ส่วนที่ทำเป็น Provider ยังไม่ได้ handle อะไรมากมาย เน้นให้มันใช้งานได้ครับ (ตัวโค๊ดยัง improve ได้อีกเยอะ)
ทีนี้เมื่อมาดู requrement ตัว Challenge ทำให้ผมสร้าง Abstract function ได้ 2 ตัวคือ
// write the given name and save "Hello {message}!" to contract storage.export function hello(message: string): string {}
// read a message by account_id from contract storage.export function get_hello(account_id: AccountId): string {}
สร้างโปรเจ็ค
เริ่มแรก ต้องตั้ง toolchain เป็น wasm32-unknown-unknown เพื่อ compile เป็น WASM (ผมเคยตั้งไว้นานแล้ว เลยข้ามขั้นตอนนี้ไป)
rustup target add wasm32-unknown-unknownผมสร้างจาก create-next-app และใช้ tailwindcss เป็น CSS
npx create-next-app helloworld
npm install -D tailwindcss postcss autoprefixernpx tailwindcss init -p- ตัว Tailwind ตั้งค่ากับ Next.js - อ่านเพิ่มเติมนะครับ ทำตามได้เลย
ต่อมา ตัว Contract ก็สร้างจาก cargo เลย
cargo new contract --libจากนั้นเปลี่ยนชื่อ App และ Cargo.toml โดยเพิ่ม near-sdk เป็น dependencies และปรับ profile.release (อันนี้ผมยังไม่ค่อยเข้าใจเท่าไหร่ Reference จากอันนี้ ครับ)
[package]name = "helloworld"authors = ["Chai Phonbopit"]version = "0.1.0"edition = "2021"
# See more keys and their definitions at https://doc.rust-lang.org/cargo/reference/manifest.html
[dependencies]near-sdk = "3.1.0"
[lib]crate-type = ["cdylib"]
[profile.release]codegen-units = 1# Tell `rustc` to optimize for small code size.opt-level = "z"lto = truedebug = falsepanic = "abort"# Opt into extra safety checks on arithmetic operations https://stackoverflow.com/a/64136471/249801overflow-checks = true
Rust Contract.
ตัว Rust Contract ในการเก็บ Collection ทีแรกผมคิดว่าจะเลือกใช้ Collection ที่มันรองรับ Iterator เผื่อจะได้ filter หรือ list ได้ แต่พอ requirement ของ Challenge แค่แสดง hello และ get hello ก็เลย ใช้แค่ LookupMap พอ
เรื่องของ Data Storage ใน NEAR - Data Storage / Collections
use near_sdk::borsh::{self, BorshDeserialize, BorshSerialize};use near_sdk::collections::LookupMap;use near_sdk::{env, log, near_bindgen, AccountId};
#[near_bindgen]#[derive(BorshDeserialize, BorshSerialize)]pub struct HelloWorld {    pub messages: LookupMap<AccountId, String>,}
impl Default for HelloWorld {    fn default() -> Self {        Self {            // messages: LookupMap::new(b"a".to_vec()),            messages: LookupMap::new("".as_bytes().to_vec()),        }    }}
#[near_bindgen]impl HelloWorld {    pub fn hello(&mut self, message: String) {        let account_id = env::signer_account_id();        let greeting = format_args!("Hello {message}!").to_string();
        log!(            "{} hello with message {} and greeting: {}",            account_id,            message,            greeting        );
        self.messages.insert(&account_id, &greeting);    }
    pub fn get_hello(&self, account_id: AccountId) -> String {        match self.messages.get(&account_id) {            Some(value) => {                log!("value from lookupMap(messages) is {}", value);                value            }            None => "not found".to_string(),        }    }}
เริ่มแรกผมกำหนด Struct HelloWorld ข้างในเป็น messages เป็น LookupMap แบบ key value ด้วย AccountId และ String
#[near_bindgen]#[derive(BorshDeserialize, BorshSerialize)]pub struct HelloWorld { pub messages: LookupMap<AccountId, String>,}Implement default function (เข้าใจว่าเหมือนกับ contrcutor ของ Class และส่วน b"a".to_vec() ผมเข้าใจว่าเป็น byte string literal เลยลอง comment และเขียนอีกแบบลงไป น่าจะเหมือนกัน หากผมเข้าใจผิด ใครหลงเข้ามาอ่าน แนะนำด้วยครับ)
impl Default for HelloWorld { fn default() -> Self { Self { // messages: LookupMap::new(b"a".to_vec()), messages: LookupMap::new("".as_bytes().to_vec()), } }}ส่วน hello กับ get_hello ก็ไม่มีอะไรมาก
helloรับค่าmessageจาก User ส่วนaccount_idเป็น accountId ของ signer จากนั้น format string เพื่อให้ตรงกับHello {message}เซฟลงLookupMapชื่อmessagesget_hello- ก็รับค่าaccount_idไป filter หาในLookupMapใช้matchเอาไว้เช็ค ถ้าเจอ ก็ส่ง value กลับ ถ้าไม่เจอ ขึ้นnot found
pub fn hello(&mut self, message: String) {    let account_id = env::signer_account_id();    let greeting = format_args!("Hello {message}!").to_string();
    log!(        "{} hello with message {} and greeting: {}",        account_id,        message,        greeting    );
    self.messages.insert(&account_id, &greeting);}
pub fn get_hello(&self, account_id: AccountId) -> String {    match self.messages.get(&account_id) {        Some(value) => {            log!("value from lookupMap(messages) is {}", value);            value        }        None => "not found".to_string(),    }}
ส่วน Test รวมๆ ผมดูจาก create-near-app ซึ่งยังไม่ค่อยเข้าใจการทำงานมันมาก พวก Mock, VMContext เดี๋ยวค่อยดูเพ่ิมเติม
use near_sdk::MockedBlockchain;use near_sdk::{testing_env, VMContext};เอาแค่รันเทสผ่านก่อน เดาแค่ว่ามันน่าจะ Mock blockchain แบบ block 0 ให้เรา สิ่งที่ทำก็แค่เขียน test case ลงไป (อันนี้เดานะ)
Context มี set true, false สำหรับ View กับ Call
#[test]fn set_then_get_hello() {    let context = get_context(vec![], false);    testing_env!(context);
    let mut contract = HelloWorld::default();    contract.hello("Chuck".to_string());
    let message = contract.get_hello("bob_near".to_string());    assert_eq!("Hello Chuck!".to_string(), message);}
#[test]fn get_default_hello() {    let context = get_context(vec![], true);    testing_env!(context);
    let contract = HelloWorld::default();    let message = contract.get_hello("bob_near".to_string());
    assert_eq!("not found".to_string(), message);}
ก่อนไป Client ผมสร้าง Makefile สำหรับ รัน build และ deploy เพราะไม่อยากเสียเวลาพิมพ์ยาวๆ (ไม่ได้ทำให้รองรับ args นะครับ ตอนนี้คือ hardcode)
build: cd contract && cargo build --target wasm32-unknown-unknown --releasedeploy: near deploy --wasmFile contract/target/wasm32-unknown-unknown/release/helloworld.wasm --accountId helloworld.0xchai.testnettest: cd contract && cargo testClient (near-api-js)
ฝั่ง Client ใช้ near-api-js ซึ่งใน Doc มีตัวอย่าง มี Cookbook ให้เราอ่าน ทำความเข้าใจได้ครับ
สิ่งที่ผมต้องทำคือ
ผมสร้างเป็น NearWalletProvider ขึ้นมาครับ
แล้วครอบตัว App ใน _app.js เป็นแบบนี้
const config = {  // ...config}
function MyApp({ Component, pageProps }) {  return (    <NearWalletProvider config={config}>      <Component {...pageProps} />    </NearWalletProvider>  )}
คร่าวๆคือ สร้าง config ก่อน (ของผมใช้วิธี handle config เผื่อเปลี่ยน environment เป็น mainnet แต่จริงๆไม่ได้ใช้ ทำเผื่อเฉยๆ)
// 1. กำหนด config (ถ้าใน NearWalletProvider ผมส่งเป็น prop มา)const config = {  networkId: 'testnet',  nodeUrl: 'https://rpc.testnet.near.org',  walletUrl: 'https://wallet.testnet.near.org',  helperUrl: 'https://helper.testnet.near.org',  explorerUrl: 'https://explorer.testnet.near.org'}
// 2. Connect Walletconst near = await connect({  ...config,  keyStore: new keyStores.BrowserLocalStorageKeyStore()})
// 3. Connect ด้วยชื่อ app เราconst wallet = new WalletConnection(near, 'helloworld')
// 4. เช็ค authorizedlet accountId = wallet.getAccountId()
// 5. ถ้า signed in เราก็จะ get account กับ initial contract.if (accountId) {  const accountState = await wallet.account().state()
  // 6. initial contract. ขอ view, call `get_hello` กับ `hello`  const contract = await new Contract(wallet.account(), config.contractName, {    viewMethods: ['get_hello'],    changeMethods: ['hello']  })
  // 7. set state (Provider.Context) เผื่อเอาไปใช้  setState({    wallet,    contract,    account: {      accountId    },    signIn: () => {      wallet.requestSignIn(config.contractName)    },    signOut: () => wallet.signOut(),    isSignedIn: wallet.isSignedIn(),    loadAccount: (accountId) => () => near.account(accountId)  })}
คร่าวๆ ประมาณนี้ครับ ใน NearWalletProvider ผมเขียนไว้ไม่ดีนะครับ แค่ handle คร่าวๆ ครับ (อนาคต อยากจะลอง improve ให้มันเหมือนๆ กับพวก useDapp, React Web3 หรือ Solana Wallet Adapter)
ส่วนหน้า index.js ผมก็แค่เรียก state จาก Context เพื่อเข้าถึง contract, wallet และ function signIn ครับ
export default function Home() {  const { account, contract, signIn } = useContext(WalletContext);
  const hello = async () => {    await contract.hello({ message });  };
  const handleMessage = (event) => {    const value = event.target.value;    setMessage(value);  };
  const handleGetHello = async () => {    const message = await contract.get_hello({      account_id: account?.accountId    });  };
  const connectWallet = async () => {    signIn();  };
  return (    //...  )}
ส่วนที่เหลือคือ UI ก็ปรับตามสะดวก เมื่อเว็บเสร็จเรียบร้อย ก็ Deploy ลง Vercel ด้วยการใช้ Git repository
สรุป
หลังจากลองทำ Challenge ง่ายๆ ดู ก็สนุกดี ได้ลอง ได้อ่าน contract หลากหลาย ทั้งแบบง่ายๆ และก็ซับซ้อน เพื่อดูว่าถ้า advanced จะเขียนยังไง ซึ่งจริงๆ AssemblyScript ดูง่ายกว่าเยอะเลย ฮ่าๆ
ตัว NEAR ผมก็ลองเล่นมาไม่นานไม่ถึงเดือน แต่ก็นิดๆหน่อยๆ แล้วก็แบบมั่วๆ เน้นแค่ตาม tutorial เข้าใจบ้าง ไม่เข้าใจบ้าง เน้นทำตามไปก่อน แต่พอมาวันนี้ มาลองทำตั้งแต่ต้น ได้ลองผิดลองถูก ก็พอเข้าใจมากขึ้นไปอีกระดับ (แถมเหมือนได้รื้อฟื้นสกิล React ที่ทิ้งไปนาน ยอมรับเลยว่า แค่สร้าง Context ง่ายๆ ผมยังทำไม่ได้เลย นั่งอ่านบทความ และลองทำนานมาก)
สำหรับผู้หลงเข้ามาอ่าน คำแนะนำเดียวของผมเลยคือ ลงมือทำครับ แล้วคุณจะเข้าใจ มากกว่าการแค่อ่าน Tutorial
Happy Coding ❤️
- Authors
-

Chai Phonbopit
Senior Software Engineer ประสบการณ์กว่า 12 ปี ด้าน Frontend: React, Next.js, Tailwind CSS และ Backend: Node.js, Express, NestJS ปัจจุบันสนใจ Astro, Cloudflare Workers และ AI Coding Tool