สวัสดีครับ วันนี้มาพบกับบทความเกี่ยวกับการเขียน Smart Contract บน Solana กันนะครับ จริงๆ บทความนี้เกิดขึ้นมาเพราะผมอยากทบทวนและเรียบเรียงสิ่งที่เรียนรู้มาครับ และอยากลองดูว่าเข้าใจขั้นตอนการทำงานของมันมั้ย โดยการดูจาก Example HelloWorld ครับ
และเมื่อเสาร์ อาทิตย์ที่ผ่านมา (จริงๆคือ 4ทุ่ม - ตี1 เวลาไทย) ไปลองเรียน Solana Bootcamp - Chainlink วันละ 3ชั่วโมง 2วัน แล้วรู้สึกว่าได้รู้อะไรเยอะขึ้นมาก (แม้ว่าโค๊ดที่เขียนๆ พิมพ์ๆ จะเข้าใจไม่ถึง 50% ก็เถอะ) หลังจากไปนั่งอ่านเพิ่ม นั่งฝึกเขียนเพิ่ม ก่อนหน้านี้เคยลอง Anchor แต่ก็ยังไม่ค่อยเข้าใจมาก ส่วนนึงเพราะ syntax Rust ที่ไม่ชิน และไม่คล่อง จนพอเริ่มเข้าใจ Rust มากขึ้น มาอ่าน Solana หรือ Anchor อีกรอบ ก็เข้าใจมากขึ้นไปด้วย เลยลองเขียนเป็นบทความดูว่าจะออกมาเป็นยังไง
เตรียมความพร้อม
- เข้าใจ Rust เบื้องต้น (หรืออ่านโค๊ดแล้วพอเข้าใจ ก็โอเคครับ) - สำหรับคนมีพื้นฐานโปรแกรมมิ่ง ลองอ่านแบบเร็วๆ สั้นๆ Rust Playground และ Learn Rust in X minutes
- ใช้งาน Command Line พื้นฐานเป็น
- ติดตั้ง Node.js เรียบร้อยแล้ว เข้าใจ JavaScript หรือ TypeScript
Step 0 - Solana คร่าวๆ
- หน่วยคือ SOL และ Lamports โดย 1 Lamport มีค่า 0.000000001 SOL
- มี clusters หลักๆคือ Local (Localnet/Test Validator), Devnet, Testnet และ Mainnet beta
- Program หรือเรียกอีกอย่างว่า Smart Contract (ใน chain อื่นๆ)
- Program หลักๆ มี Native Program และ Solana Program Library (SPL)
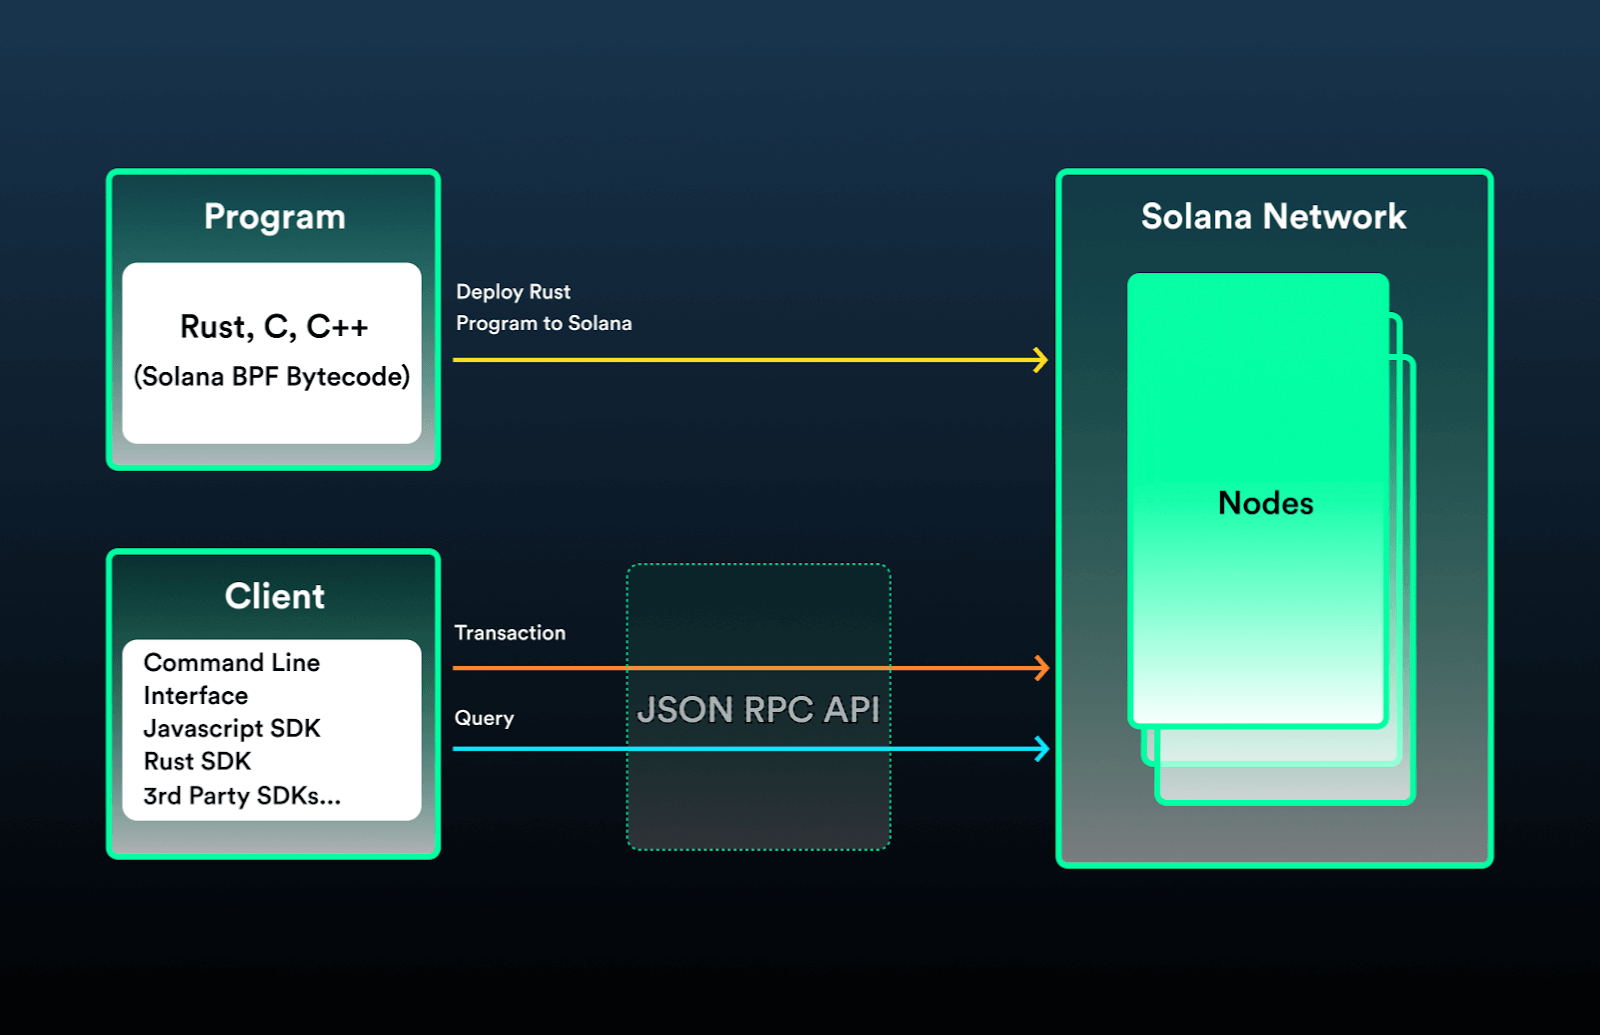
- จากรูปด้านบน จะเห็นว่า เราสามารถเขียน Program ได้หลายภาษาไม่ว่าจะเป็น Rust, C หรือ C++
- สามารถส่ง transaction หรือ query ด้วย Client ต่างๆ ผ่าน JSON-RPC API
- ฝั่ง Client ทำได้ทั้ง CLI, JavaScript SDK, Rust SDK หรืออื่นๆ
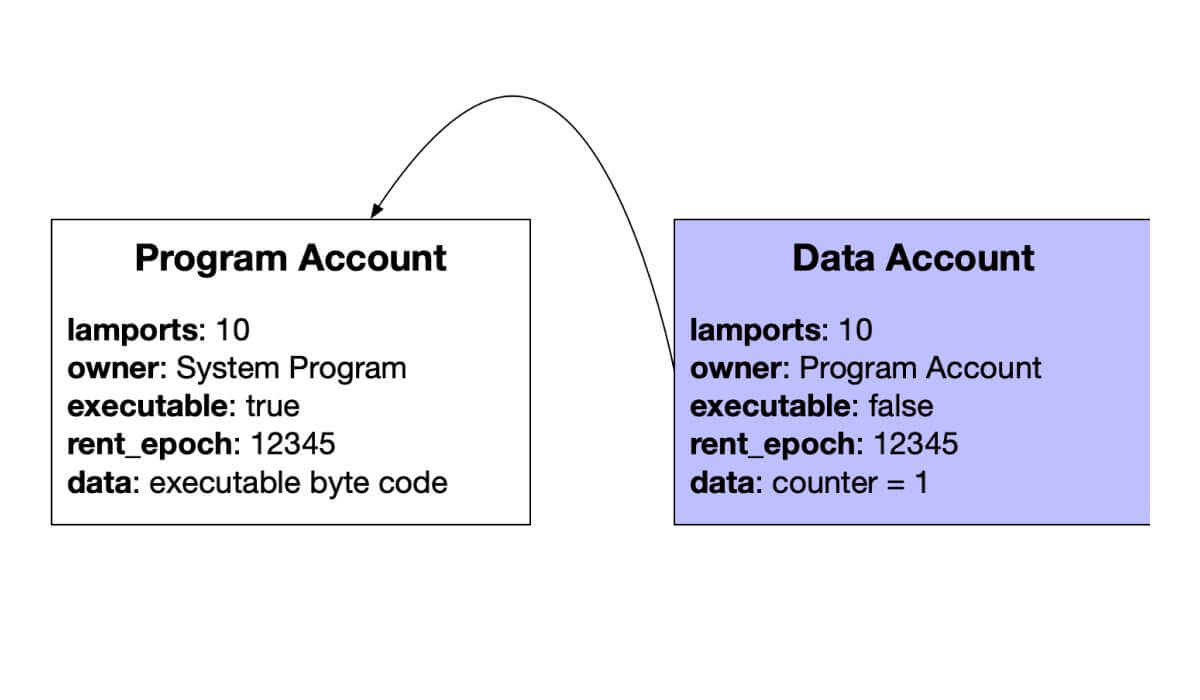
- Account ใน Solana ใช้สำหรับเก็บ state แบ่งหลักได้ 3 แบบ Data Account, Program Account และ Native Account.
- Data account มี System owned account และ Program derived address (PDA) account.
- Program account จะไม่เก็บ state
- สมมติเราสร้าง Program (Smart Contract) ขึ้นมา 1 ตัว เป็น counter ง่ายๆ นับเลข ต้องมี 2 account คือ 1. ไว้เก็บโค๊ด และ 2. ไว้เก็บข้อมูล state.
Reference : Solana Cookbook
Step 1 - ติดตั้งโปรแกรม
ติดตั้ง Rust
อย่างแรก ติดตั้ง Rust ก่อนครับ โดยเข้าไปที่เว็บ rustup จะมีขั้นตอนการติดตั้ง (ถ้าเป็น Windows ก็จะเป็นตัว urstup-init.exe ดาวน์โหลดไป install ได้เลย)
curl --proto '=https' --tlsv1.2 -sSf https://sh.rustup.rs | shตัว rustup จะติดตั้งพร้อมกับ rustc ที่เป็น compiler และ cargo เป็นตัว Package Manager คล้ายๆกับ Yarn / npm ของฝั่ง Node.js
เช็คว่า ติดตั้งเรียบร้อยมั้ย ด้วยคำสั่ง:
rustup --versionrustc --versionและ
cargo --versionติดตั้ง Solana CLI
ขั้นตอนนี้ เราจะติดตั้งตัว Solana CLI กันนะครับ โดยเราสามารถเลือกติดตั้ง แต่ละเวอร์ชั่นได้ เช่น ด้านล่าง ติดตั้ง v1.10.6 ซึ่งเป็นเวอร์ชั่น beta
sh -c "$(curl -sSfL https://release.solana.com/v1.10.6/install)"หากใครอยากได้ที่เป็น stable version ก็สามารถติดตั้งได้ ด้วยการเปลี่ยน v1.10.6 เป็น stable แบบนี้
sh -c "$(curl -sSfL https://release.solana.com/stable/install)"เช็คว่า solana ติดตั้งเรียบร้อยแล้ว :
solana versionติดตั้ง Node.js
สำหรับใครยังไม่มี Node.js สามารถติดตั้งได้ โดยเลือกดาวน์โหลดแบบ 16.14.2 LTS (ณ ช่วงเวลาที่เขียน)
หรือผ่าน Homebrew ก็แค่
brew install nodeสำหรับ Windows สามารถเลือกไฟล์ .msi เพื่อทำการติดตั้งได้เลยครับ
เช็คเวอร์ชั่น
node --versionสรุป เวอร์ชันในเครื่องของผม ดังนี้
- Rustup - 1.24.3
- Rustc - 1.59.0
- Cargo - 1.59.0
- Solana - 1.9.14
- Node.js - 16.14.2
Step 2 - Solana CLI
ต่อมา เราจะ setup และตั้งค่า CLI รวมถึง local cluster กันก่อนครับ ก่อนที่จะไปเริ่มสร้างโปรเจ็คกัน
ขั้นแรก ตั้งค่า config ให้เป็น localhost
solana config set --url localhostต่อมาสร้าง Keypair ขึ้นมา
solana-keygen newระบบจะให้เราใส่รหัส BIP39 Passphrase เพื่อเพิ่มความปลอดภัยขึ้น (สำหรับ dev ไม่ต้องใส่ก็ได้ครับ) แนะนำว่ากระเป๋า dev ไม่ควรเอาไปใช้กับเงินจริงๆนะครับ
BIP39 Passphrase (empty for none):``
จากนั้นระบบก็จะ generate 12 คำ ซึ่งก็เหมือน Wallet อื่นๆ เราต้องจดไว้
```bashWrote new keypair to /Users/chai/.config/solana/id.json==============================================================================pubkey: G2s5SoQt4uxpnt8soSdcfGL4Gt78cpt1MmyruP4BUoss==============================================================================Save this seed phrase and your BIP39 passphrase to recover your new keypair:<--------12 คำ อยู่ตรงนี้------>==============================================================================
คำ 12 คำที่เราต้องจดไว้ หากเราต้องการสร้าง KeyPair เพื่อใช้งานจริงๆ อย่าให้ใครรู้ Seedphrase รวมถึง ข้อมูล Keypair ที่เป็น
id.jsonนะครับ เพราะข้างในคือ public key + private key สามารถเอาไปใช้งานได้เลย (แต่ถ้า dev ก็ไม่เป็นไร เราสร้างแล้วท้ิง ไม่ได้ใช้อยู่แล้ว)
เช็คว่าถูกต้องมั้ย ด้วยคำสั่ง
solana config getจะได้ผลลัพธ์ประมาณนี้
Config File: /Users/chai/.config/solana/cli/config.ymlRPC URL: http://localhost:8899WebSocket URL: ws://localhost:8900/ (computed)Keypair Path: /Users/chai/.config/solana/id.jsonCommitment: confirmedต่อมา ต้องรัน local cluster (ควรเปิด Terminal อีกหน้าไว้) ด้วยคำสั่ง
solana-test-validatorสามารถดู logs ได้ ด้วยคำสั่ง (เปิด Terminal อีกแท็ป)
solana logsStep 3 - สร้างโปรเจ็ค
เริ่มสร้างโปรเจ็ค โดยอ้างอิงจาก ตัว Source Code จาก โปรเจ็ค Example Hello World ของ Solana นะครับ ซึ่งวิธีการเรียนรู้ที่ดีที่สุด คือ อ่านโค๊ดและลงมือทำ แม้จะเป็น Hello World ก็ตาม
ต่อมาสร้างโปรเจ็คขึ้นมาด้วย cargo ผมตั้งชื่อว่าโปรเจ็คว่า solana-helloworld (ชื่อแล้วแต่เพื่อนๆเลย)
cargo init solana-helloworld --libตัว Cargo จะสร้างไฟล์ให้เราดังนี้
├── Cargo.toml└── src └── lib.rsเราสร้างโดยใช้ --lib จะได้ไฟล์ lib.rs แต่ถ้าปกติจะเป็น main.rs นะครับ
ไฟล์ Cargo.toml จะได้เป็นแบบนี้
[package]name = "solana-helloworld"version = "0.1.0"edition = "2021"
# See more keys and their definitions at https://doc.rust-lang.org/cargo/reference/manifest.html
[features]no-entrypoint = []
[dependencies]borsh = "0.9.3"borsh-derive = "0.9.3"solana-program = "=1.10.6"
[lib]name = "solana_helloworld"crate-type = ["cdylib", "lib"]
Dependencies ที่ใช้ แบ่งเป็น
- borsh และ borse-derive - สำหรับทำ Deserialize และ Serialize
- solana-program - สำหรับการเขียน Program บน Solana (EVM เรียก Smart Contract แต่ Solana เรียก Program)
ต่อมาที่ไฟล์ src/lib.rs พิมพ์โค๊ดนี้ลงไป
use borsh::{BorshDeserialize, BorshSerialize};use solana_program::{    account_info::{next_account_info, AccountInfo},    entrypoint,    entrypoint::ProgramResult,    msg,    program_error::ProgramError,    pubkey::Pubkey,};
/// Define the type of state stored in accounts#[derive(BorshSerialize, BorshDeserialize, Debug)]pub struct GreetingAccount {    /// number of greetings    pub counter: u32,}
// Declare and export the program's entrypointentrypoint!(process_instruction);
// Program entrypoint's implementationpub fn process_instruction(    program_id: &Pubkey, // Public key of the account the hello world program was loaded into    accounts: &[AccountInfo], // The account to say hello to    _instruction_data: &[u8], // Ignored, all helloworld instructions are hellos) -> ProgramResult {    msg!("Hello World Rust program entrypoint");
    // Iterating accounts is safer than indexing    let accounts_iter = &mut accounts.iter();
    // Get the account to say hello to    let account = next_account_info(accounts_iter)?;
    // The account must be owned by the program in order to modify its data    if account.owner != program_id {        msg!("Greeted account does not have the correct program id");        return Err(ProgramError::IncorrectProgramId);    }
    // Increment and store the number of times the account has been greeted    let mut greeting_account = GreetingAccount::try_from_slice(&account.data.borrow())?;    greeting_account.counter += 1;    greeting_account.serialize(&mut &mut account.data.borrow_mut()[..])?;
    msg!("Greeted {} time(s)!", greeting_account.counter);
    Ok(())}
ทดลอง build โปรแกรมดู ตัว Cargo จะทำการ download dependencies และ compile ครับ
cargo build --manifest-path=./Cargo.tomlจะได้ผลลัพธ์ว่า build เรียบร้อย แสดงว่าไม่ติดปัญหา
Compiling solana-helloworld v0.1.0 (/Users/chai/dev/solana-helloworld) Finished dev [unoptimized + debuginfo] target(s) in 20.31sทีนี้ตัว Solana เราต้อง build เป็น BPF - Berkeley Packet Filter ก็เลยเปลี่ยน script เป็นแบบนี้
cargo build-bpf --manifest-path=./Cargo.toml --bpf-out-dir=dist/programโดยกำหนด output ไฟล์คือโฟลเดอร์ dist/program
หลังจาก build เสร็จ สังเกตไฟล์ dist/program จะมี 2 ไฟล์คือ
├── solana_helloworld-keypair.json└── solana_helloworld.soสิ่งที่เราต้องทำคือ deploy ตัว solana_helloworld.so ลง on-chain ที่ local-cluster ของเรา
Deploy ด้วยคำสั่ง
solana program deploy dist/program/solana_helloworld.soจะได้ผลลัพธ์เป็นเลข Program Id ของเรา
Program Id: 2rQ5YJQ7tG6xEyY2M37frBi7Y1u3wWT1ap8hZDs9Gcweเท่านี้ ก็เรียบร้อย ในการ deploy ลง local cluster (สามารถดู logs ได้)
4. เชื่อม Client SDK
ต่อมาเราต้องใช้ JavaScript/ TypeScript เป็น Client เพื่อเรียก Program ที่เรา deploy ลง local cluster ผ่าน JSON-RPC ครับ
สร้าง package.json เปล่าๆ ขึ้นมาก่อน ด้วยคำสั่ง
yarn init -y
# หรือ npmnpm init -y
จากนั้นติดตั้ง solana/web3.js, borsh และ typescript ดังนี้
npm install borsh @solana/web3.js yaml
npm install @types/yaml @tsconfig/recommended ts-node typescript --save
ไฟล์ package.json จะได้แบบนี้
{ "name": "solana-helloworld", "version": "1.0.0", "main": "index.js", "author": "Chai Phonbopit", "license": "MIT", "dependencies": { "@solana/web3.js": "1.37.1", "borsh": "0.7.0", "yaml": "2.0.0" }, "devDependencies": { "@tsconfig/recommended": "1.0.1", "@types/yaml": "1.9.7", "ts-node": "10.7.0", "typescript": "4.6.3" }}สร้างไฟล์ tsconfig.json ขึ้นมา
{ "extends": "@tsconfig/recommended/tsconfig.json", "ts-node": { "compilerOptions": { "module": "commonjs" } }, "compilerOptions": { "declaration": true, "moduleResolution": "node", "module": "es2015" }, "include": ["src/**/*"], "exclude": ["node_modules"]}สร้างโฟลเดอร์ client เอาไว้เก็บไฟล์ ดังนี้
main.ts- เป็นไฟล์หลักเอาไว้รัน programhello_world.ts- ไฟล์ business logic ต่างๆutils.ts- ไฟล์ utils
import {  establishConnection,  establishPayer,  checkProgram,  sayHello,  reportGreetings} from './hello_world'
async function main() {  console.log("Let's say hello to a Solana account...")
  // Establish connection to the cluster  await establishConnection()
  // Determine who pays for the fees  await establishPayer()
  // Check if the program has been deployed  await checkProgram()
  // Say hello to an account  await sayHello()
  // Find out how many times that account has been greeted  await reportGreetings()
  console.log('Success')}
main().then(  () => process.exit(),  (err) => {    console.error(err)    process.exit(-1)  })
หากเราดู client/main.ts เราจะเห็นว่า การทำงานคร่าวๆ แม้จะยังไม่เห็น implementation คือ เริ่มจาก
- เช็ค connection local cluster ว่าเชื่อมต่อมั้ย
- เช็ค program ที่เรา deploy ไว้ถูกต้องมั้ย
sayHelloเป็นการส่ง transaction ไปที่ programreportGreetingsเป็นการดึงข้อมูล state (query) ของ program มาแสดง
ไฟล์ utils ก็ไม่มีอะไรมาก เป็นแค่ helper ที่ช่วย อ่านไฟล์ต่างๆ เช่น config หรือ keypair
import os from 'os'import fs from 'fs/promises'
import path from 'path'import yaml from 'yaml'import { Keypair } from '@solana/web3.js'
/** * @private */async function getConfig(): Promise<any> {  // Path to Solana CLI config file  const CONFIG_FILE_PATH = path.resolve(os.homedir(), '.config', 'solana', 'cli', 'config.yml')  const configYml = await fs.readFile(CONFIG_FILE_PATH, { encoding: 'utf8' })  return yaml.parse(configYml)}
/** * Load and parse the Solana CLI config file to determine which RPC url to use */export async function getRpcUrl(): Promise<string> {  try {    const config = await getConfig()    if (!config.json_rpc_url) throw new Error('Missing RPC URL')    return config.json_rpc_url  } catch (err) {    console.warn('Failed to read RPC url from CLI config file, falling back to localhost')    return 'http://127.0.0.1:8899'  }}
/** * Load and parse the Solana CLI config file to determine which payer to use */export async function getPayer(): Promise<Keypair> {  try {    const config = await getConfig()    if (!config.keypair_path) throw new Error('Missing keypair path')    return await createKeypairFromFile(config.keypair_path)  } catch (err) {    console.warn(      'Failed to create keypair from CLI config file, falling back to new random keypair'    )    return Keypair.generate()  }}
/** * Create a Keypair from a secret key stored in file as bytes' array */export async function createKeypairFromFile(filePath: string): Promise<Keypair> {  const secretKeyString = await fs.readFile(filePath, { encoding: 'utf8' })  const secretKey = Uint8Array.from(JSON.parse(secretKeyString))  return Keypair.fromSecretKey(secretKey)}
ต่อมาไฟล์หลัก hello_world.ts
/* eslint-disable @typescript-eslint/no-unsafe-assignment *//* eslint-disable @typescript-eslint/no-unsafe-member-access */
import {  Keypair,  Connection,  PublicKey,  LAMPORTS_PER_SOL,  SystemProgram,  TransactionInstruction,  Transaction,  sendAndConfirmTransaction} from '@solana/web3.js'import fs from 'fs'import path from 'path'import * as borsh from 'borsh'
import { getPayer, getRpcUrl, createKeypairFromFile } from './utils'
let connection: Connection
let payer: Keypair
let programId: PublicKey
let greetedPubkey: PublicKey
const PROGRAM_PATH = path.resolve(__dirname, '../dist/program')const PROGRAM_SO_PATH = path.join(PROGRAM_PATH, 'solana_helloworld.so')const PROGRAM_KEYPAIR_PATH = path.join(PROGRAM_PATH, 'solana_helloworld-keypair.json')
/** * The state of a greeting account managed by the hello world program */class GreetingAccount {  counter = 0  constructor(fields: { counter: number } | undefined = undefined) {    if (fields) {      this.counter = fields.counter    }  }}
/** * Borsh schema definition for greeting accounts */const GreetingSchema = new Map([  [GreetingAccount, { kind: 'struct', fields: [['counter', 'u32']] }]])
/** * The expected size of each greeting account. */const GREETING_SIZE = borsh.serialize(GreetingSchema, new GreetingAccount()).length
/** * Establish a connection to the cluster */export async function establishConnection(): Promise<void> {  const rpcUrl = await getRpcUrl()  connection = new Connection(rpcUrl, 'confirmed')  const version = await connection.getVersion()  console.log('Connection to cluster established:', rpcUrl, version)}
/** * Establish an account to pay for everything */export async function establishPayer(): Promise<void> {  let fees = 0  if (!payer) {    const { feeCalculator } = await connection.getRecentBlockhash()
    // Calculate the cost to fund the greeter account    fees += await connection.getMinimumBalanceForRentExemption(GREETING_SIZE)
    // Calculate the cost of sending transactions    fees += feeCalculator.lamportsPerSignature * 100 // wag
    payer = await getPayer()  }
  let lamports = await connection.getBalance(payer.publicKey)  if (lamports < fees) {    // If current balance is not enough to pay for fees, request an airdrop    const sig = await connection.requestAirdrop(payer.publicKey, fees - lamports)    await connection.confirmTransaction(sig)    lamports = await connection.getBalance(payer.publicKey)  }
  console.log(    'Using account',    payer.publicKey.toBase58(),    'containing',    lamports / LAMPORTS_PER_SOL,    'SOL to pay for fees'  )}
/** * Check if the hello world BPF program has been deployed */export async function checkProgram(): Promise<void> {  // Read program id from keypair file  try {    const programKeypair = await createKeypairFromFile(PROGRAM_KEYPAIR_PATH)    programId = programKeypair.publicKey  } catch (err) {    const errMsg = (err as Error).message    throw new Error(      `Failed to read program keypair at '${PROGRAM_KEYPAIR_PATH}' due to error: ${errMsg}. Program may need to be deployed with \`solana program deploy dist/program/helloworld.so\``    )  }
  // Check if the program has been deployed  const programInfo = await connection.getAccountInfo(programId)  if (programInfo === null) {    if (fs.existsSync(PROGRAM_SO_PATH)) {      throw new Error(        'Program needs to be deployed with `solana program deploy dist/program/helloworld.so`'      )    } else {      throw new Error('Program needs to be built and deployed')    }  } else if (!programInfo.executable) {    throw new Error(`Program is not executable`)  }  console.log(`Using program ${programId.toBase58()}`)
  // Derive the address (public key) of a greeting account from the program so that it's easy to find later.  const GREETING_SEED = 'hello'  greetedPubkey = await PublicKey.createWithSeed(payer.publicKey, GREETING_SEED, programId)
  // Check if the greeting account has already been created  const greetedAccount = await connection.getAccountInfo(greetedPubkey)  if (greetedAccount === null) {    console.log('Creating account', greetedPubkey.toBase58(), 'to say hello to')    const lamports = await connection.getMinimumBalanceForRentExemption(GREETING_SIZE)
    const transaction = new Transaction().add(      SystemProgram.createAccountWithSeed({        fromPubkey: payer.publicKey,        basePubkey: payer.publicKey,        seed: GREETING_SEED,        newAccountPubkey: greetedPubkey,        lamports,        space: GREETING_SIZE,        programId      })    )    await sendAndConfirmTransaction(connection, transaction, [payer])  }}
/** * Say hello */export async function sayHello(): Promise<void> {  console.log('Saying hello to', greetedPubkey.toBase58())  const instruction = new TransactionInstruction({    keys: [{ pubkey: greetedPubkey, isSigner: false, isWritable: true }],    programId,    data: Buffer.alloc(0) // All instructions are hellos  })  await sendAndConfirmTransaction(connection, new Transaction().add(instruction), [payer])}
/** * Report the number of times the greeted account has been said hello to */export async function reportGreetings(): Promise<void> {  const accountInfo = await connection.getAccountInfo(greetedPubkey)  if (accountInfo === null) {    throw 'Error: cannot find the greeted account'  }  const greeting = borsh.deserialize(GreetingSchema, GreetingAccount, accountInfo.data)  console.log(greetedPubkey.toBase58(), 'has been greeted', greeting.counter, 'time(s)')}
ถ้าหากว่าไม่ได้ใช้ชื่อโปรเจ็คว่า solana_helloworld อย่าลืมเปลี่ยน path ให้ตรงด้วยนะครับ
ลองรัน client ดูผลลัพธ์ครับ
ts-node client/main.tsจะได้ผลลัพธ์แบบนี้
Let's say hello to a Solana account...Connection to cluster established: http://localhost:8899 { 'feature-set': 1070292356, 'solana-core': '1.9.14' }Using account 2B82KUoFQXHjGz6aV8hzJgvCuCfgPTSi9eAW9TMpqbv1 containing 499999999.15446967 SOL to pay for feesUsing program 2rQ5YJQ7tG6xEyY2M37frBi7Y1u3wWT1ap8hZDs9GcweCreating account 2mhCSXCeAK4A5uyw6TSq527vpw9pbdAuoSoWWZrp7juS to say hello toSaying hello to 2mhCSXCeAK4A5uyw6TSq527vpw9pbdAuoSoWWZrp7juS2mhCSXCeAK4A5uyw6TSq527vpw9pbdAuoSoWWZrp7juS has been greeted 1 time(s)Successและถ้าเรารันอีกรอบ ค่า counter ก็จะเพิ่มเรื่อยๆ
5. Deserialize/Serialize
เราจะเห็นว่า ตอนเราใช้ JavaScript SDK เรียกผ่าน JSON RPC เราต้องทำการแปลง Deserialize/Serialize รวมถึงต้องกำหนด Schema ให้ตรงกันด้วย ดูแล้วยุ่งยากนิดๆ ใช่มั้ย?
ถ้าใช้ Anchor จะสะดวก และลดขั้นตอนนี้ลงได้เยอะเลย เพราะ Anchor จะ auto De/Serialize ให้เราเลย
สังเกต ไฟล์ client/hello_world.ts เราต้องกำหนด schema ด้วยแบบนี้
class GreetingAccount {  counter = 0  constructor(fields: { counter: number } | undefined = undefined) {    if (fields) {      this.counter = fields.counter    }  }}
const GreetingSchema = new Map([ [GreetingAccount, { kind: 'struct', fields: [['counter', 'u32']] }]])- โดย
GreetingAccountเป็น class ที่เราต้องกำหนด ให้มันตรงกับ hello world program ของเรา GreetingSchemaก็ต้องกำหนด struct ให้ตรง (IDL Spec) (คล้ายๆ ABI ของ Solidity)
จะเห็นว่าตอน initial ค่า counter เป็น 0 เพราะเราไม่ได้ส่งอะไรไปให้ program เลย และ program ก็ไม่ได้รับค่าใดๆ
ทีนี้ลองมาปรับแก้ client/hello_world.ts ซักนิด ให้ส่งค่า counter ไปแบบกำหนดเอง
export async function sayHello(): Promise<void> {  console.log('Saying hello to', greetedPubkey.toBase58())
  let greetingAccount = new GreetingAccount({    counter: 0  })
  let data = borsh.serialize(GreetingSchema, greetingAccount)  const instructionData = Buffer.from(data)  console.log('data to send', instructionData.toString('utf-8'))
  const instruction = new TransactionInstruction({    keys: [{ pubkey: greetedPubkey, isSigner: false, isWritable: true }],    programId,    data: instructionData  })
  await sendAndConfirmTransaction(connection, new Transaction().add(instruction), [payer])}
จะเห็นว่าสิ่งที่ต้องเพิ่มคือ ทำ serialize โดยใช้ Schema กับ instance ที่สร้างไว้ พร้อม initial state สุดท้าย ส่งค่า instructionData ที่เป็น Buffer ไป (ก่อนหน้านี้เป็น Buffer.alloc(0))
เราปรับแก้ src/lib.rs ให้รับค่าได้ โดยแก้เป็น
pub fn process_instruction(    program_id: &Pubkey, // Public key of the account the hello world program was loaded into    accounts: &[AccountInfo], // The account to say hello to    instruction_data: &[u8], // Ignored, all helloworld instructions are hellos) -> ProgramResult {    msg!("Hello World Rust program entrypoint");
    // Iterating accounts is safer than indexing    let accounts_iter = &mut accounts.iter();
    // Get the account to say hello to    let account = next_account_info(accounts_iter)?;
    // The account must be owned by the program in order to modify its data    if account.owner != program_id {        msg!("Greeted account does not have the correct program id");        return Err(ProgramError::IncorrectProgramId);    }
    let input_data = GreetingAccount::try_from_slice(&instruction_data).unwrap();    msg!("Input Data {:?}", input_data);
    // Increment and store the number of times the account has been greeted    let mut greeting_account = GreetingAccount::try_from_slice(&account.data.borrow())?;
    if input_data.counter > 0 {        greeting_account.counter = input_data.counter;    } else {        greeting_account.counter += 1;    }
    greeting_account.serialize(&mut &mut account.data.borrow_mut()[..])?;
    msg!("Greeted {} time(s)!", greeting_account.counter);
    Ok(())}
คือ เช็คว่า ถ้า client ส่ง counter มามากกว่า 0 ก็ใช้ counter จาก client แต่ถ้าส่งมา counter = 0 ก็ให้มัน += 1 แบบตอนแรก
ทีนี้ function เราก็จะได้ 2 แบบคือ นับ counter ปกติ เพิ่มทีละหนึ่ง ต่อการ sayHello() 1 ครั้ง กับ แบบที่ set counter จาก client ได้เลย
msg!()เราสามารถดู log ได้ จากsolana logsนะครับ
เมื่อเราแก้ Program ก็ต้อง build, compile และ deploy ใหม่
ทีนี้ก็ลองรัน
cargo build-bpf --manifest-path=./Cargo.toml --bpf-out-dir=dist/programsolana program deploy dist/program/solana_helloworld.so./node_modules/.bin/ts-node client/main.tsลองปรับแก้ counter ใน client/hello_world.ts และลองสั่งรัน client ดู ว่าค่าเป็นค่าที่เราส่งไปมั้ย?
./node_modules/.bin/ts-node client/main.tsได้ผลลัพธ์ เป็นอันเรียบร้อย
Let's say hello to a Solana account...Connection to cluster established: http://localhost:8899 { 'feature-set': 1070292356, 'solana-core': '1.9.14' }Using account 2B82KUoFQXHjGz6aV8hzJgvCuCfgPTSi9eAW9TMpqbv1 containing 499999998.305227 SOL to pay for feesUsing program FKb3rRG72e8ZukMhR1TKv58eWRH93WTJ9mPHTzEiWaD3Saying hello to 86rXpsW7ApWABdsyq69YsTrVtcAyhgMQQqKVoYbCYr2Rdata to send <Buffer 00 00 00 00>86rXpsW7ApWABdsyq69YsTrVtcAyhgMQQqKVoYbCYr2R has been greeted 121 time(s)Successก่อนจบ พวก script ต่างๆ ต้องมานั่งพิมพ์ตลอด ก็สร้างเป็น Makefile หรือใส่ใน script package.json ก็ได้ แบบนี้
สร้าง script มาไว้เพื่อให้ง่าย Makefile
// Makefilerun: build deploy run-clientbuild: cargo build-bpf --manifest-path=./Cargo.toml --bpf-out-dir=dist/programdeploy: solana program deploy dist/program/solana_helloworld.sorun-client: ./node_modules/.bin/ts-node client/main.tsเวลาใช้งานก็แค่รันคำสั่งสั้นๆ (แต่ต้องมี make ในเครื่องนะ)
make runหรือ
make buildหรือ package.json ก็แค่เพิ่ม script ลงไป
{ "scripts": { "run": "npm run build && npm run deploy && npm run run-client", "build": "cargo build-bpf --manifest-path=./Cargo.toml --bpf-out-dir=dist/program", "deploy": "solana program deploy dist/program/solana_helloworld.so", "run-client": "./node_modules/.bin/ts-node client/main.ts" }}และก็ใช้คำสั่งได้เหมือนกัน
yarn buildyarn deployyarn run-client# เนื่องจากคำสั่งชื่อไปชนกันกับ run :)yarn run runอื่นๆ เพิ่มเติม
หากเราไม่ต้องการ local cluster ต้องการ deploy ไป devnet หรือ testnet เราสามารถเปลี่ยน config และ deploy ไม่ต้องใส่ก็ได้ครับ
solana config set --url https://api.devnet.solana.comAirdrop ให้กับตัวเอง ก่อน เพราะ devnet ต้องใช้ SOL และไม่มี SOL ให้เหมือน local (ขอได้มากสุด 2 SOL ต่อครั้ง 24 SOL ต่อวัน)
solana airdrop 2ขอแบบระบุ address
solana airdrop 2 <addresss>เช็ค address จาก keypair ได้ด้วยคำสั่ง
solana address -K path/your/keypair.jsonถ้าต่อ devnet อย่าลืมปิด solana logs ด้วยนะ หรืออยากดู log ก็ไม่ว่ากันครับ 🤣
สรุป
ถึงแม้ว่าบทความนี้ส่วนใหญ่จะเป็น Example Hello World แต่ก็มีหลายๆ อย่างให้เราเรียนรู้ครับ ให้เราเข้าใจขั้นตอนการสร้าง, build, deploy และการเรียก JSON RPC ผ่าน JavaScript SDK Client
แม้ว่าจะไม่เข้าใจโค๊ดบางส่วน หรือเข้าใจไม่หมด ก็ไม่เป็นไร อย่างน้อย เราก็เห็นภาพ และรู้ว่าเราไม่เข้าใจส่วนไหน ก็แค่ไปทำความเข้าใจส่วนนั้นเพิ่มเติม ลองเล่น ลองปรับแก้ ลองรันโปรแกรม สิ่งสำคัญคือ การลงมือทำต่างหาก หวังว่าบทความนี้จะเป็นประโยชน์ไม่มากก็น้อย แล้วเจอกันบทความถัดไปครับ
อ่านเพิ่มเติม
สำหรับอ่านเพิ่มเติม แนะนำ Solana Developer Resources ในนั้นรวมเว็บต่างๆ ที่น่าสนใจครับ เช่น Solana Cookbook และ soldev. ส่วนถ้าอยากอ่าน Rust แนะนำเว็บ Official ของ Rust ครับ มีหนังสือและ Rustling รวมถึง Rust by Example เช่นกัน
- Authors
-

Chai Phonbopit
Senior Software Engineer ประสบการณ์กว่า 12 ปี ด้าน Frontend: React, Next.js, Tailwind CSS และ Backend: Node.js, Express, NestJS ปัจจุบันสนใจ Astro, Cloudflare Workers และ AI Coding Tool