Day 14 - ViewPager Indicator
สวัสดีครับ บทความนี้เป็นบทความที่ 14 แล้วนะครับ ที่ผมจะมาเขียน ในซีรีย์ Learn 30 Android Libraries in 30 days
สำหรับบทความทั้งหมด อ่านได้จากด้านล่างครับ
- Day 1 : AndroidStaggered Grid
- Day 2 : Paralloid
- Day 3 : Retrofit
- Day 4 : SwipeRefreshLayout
- Day 5 : Android GraphView
- Day 6 : Holo Color Picker
- Day 7 : Android Async Http
- Day 8 : Crashlytics
- Day 9 : Butter Knife
- Day 10 : Android Annotations
- Day 11 : DateTimePicker
- Day 12 : Circular Progress Button
- Day 13 : ViewPager
- Day 14 : ViewPagerIndicator
- Day 15 : FadingActionBar
- Day 16 : AutofitTextView
- Day 17 : SwipeListView
- Day 18 : ShowcaseView
- Day 19 : GreenDAO
- Day 20 : AndroidViewAnimation
- Day 21 : ActiveAndroid
- Day 22 : Twitter4J
- Day 23 : ListViewAnimations
- Day 24 : AndEngine
- Day 25 : EazeGraph
- Day 26 : Cardslib
- Day 27 : AdapterKit
- Day 28 : WeatherLib
- Day 29 : FlatUI
- Day 30 : Android Firebase
สำหรับวันนี้ขอนำเสนอเรื่อง ViewPagerIndicator ครับ จริงๆแล้วจะศึกษาเรื่องนี้ตั้งแต่เมื่อวานแล้ว แต่ว่าเห็นมันใช้ ViewPager ด้วย ก็เลยตัดสินใจเขียน Day 13 : ViewPager ไปก่อนหน้านี้ สำหรับบทความนี้ก็พูดถึง ViewPagerIndicator ล้วนๆครับ ส่วน ViewPager หรือ Fragment จะใช้คล้ายๆของ Day 13 : ViewPager นะครับ
Installation

ขั้นตอนการติดตั้ง เข้าไปหน้าเว็บของมันเลย จากนั้นเลือก ดาวน์โหลด ViewPagerIndicator Version 2.4.1 หรือใครใช้ Android Studio แล้วอยากติดตั้งแบบใช้ Gradle ก็ทำตามนี้ครับ
เปิดไฟล์ build.gradle ของ Root Project เพิ่มข้างล่างนี้ลงไป
maven { url "http://dl.bintray.com/populov/maven"}จะได้เป็นแบบนี้
// Top-level build file where you can add configuration options common to all sub-projects/modules.
buildscript { ...}allprojects { repositories { maven { url "http://dl.bintray.com/populov/maven" } jcenter() }}ต่อมาเปิดไฟล์ build.gradle ของModule เรา (ของแอพเรานั่นแหละ) ขึ้นมา แล้วเพิ่ม dependencies ลงไป
dependencies { compile 'com.viewpagerindicator:library:2.4.1@aar'}จัดการกด Sync Project เสร็จสิ้นขั้นตอนการเพิ่ม Library ไปลงมือโค๊ดกันต่อ!
Getting Started
ในส่วน ViewPagerIndicator จะมีคลาสให้ใช้งาน หลักๆ ก็ตามรูปด้านล่างนี้
ที่จริง ในส่วน Sample Code ก็มีตัวอย่าง ให้ดูแทบจะครบเลยก็ว่าได้ สำหรับบทความนี้ผมจะยกตัวอย่างมา 2-3 ตัวอย่างนะครับ เริ่มจาก
TitlePageIndicator
การใช้งาน TitlePageIndicator ทำได้โดยการประกาศแท็ก xml ดังนี้
<com.viewpagerindicator.TitlePageIndicator android:id="@+id/titles" android:layout_height="wrap_content" android:layout_width="match_parent" />โดยต้องอยู่คู่กับ ViewPager นะครับ สำหรับส่วนเลเอาท์ผมทำการสร้างขึ้นมาใหม่ชื่อว่า activity_viewpager_titlepage.xml จากนั้นก็ใส่ ViewPager และ TitlePageIndicator ดังนี้
<LinearLayout xmlns:android="http://schemas.android.com/apk/res/android" android:orientation="vertical" android:layout_width="match_parent" android:layout_height="match_parent" android:weightSum="1">
<com.viewpagerindicator.TitlePageIndicator android:id="@+id/titles" android:layout_height="0dp" android:layout_width="fill_parent" android:layout_weight="0.1" android:padding="10dp" />
<android.support.v4.view.ViewPager android:id="@+id/pager" android:layout_width="match_parent" android:layout_height="0dp" android:layout_weight="0.9"/></LinearLayout>ไม่ขออธิบายเรื่องเลเอาท์นะครับ หากใครสังเกตเห็น layout_weight และ weightSum แล้วงงว่าคืออะไร? คร่าวๆก็คือแบ่ง ratio ให้กับเลเอาท์ครับ แนะนำให้อ่านบทความ นี้ประกอบครับ Layout Weight ใช้อย่างไร ใช้ให้เป็น อธิบายไว้ดีแล้ว
เมื่อได้ Layout แล้ว ต่อมาก็สร้าง Activity ขึ้นมา ชื่อว่า ViewPagerIndicatorActivity.java
package com.devahoy.learn30androidlibraries.day14;
import android.os.Bundle;import android.support.v4.view.ViewPager;import android.support.v7.app.ActionBarActivity;
import com.devahoy.learn30androidlibraries.R;import com.devahoy.learn30androidlibraries.day13.SimplePagerAdapter;import com.viewpagerindicator.TitlePageIndicator;
public class ViewPagerIndicatorActivity extends ActionBarActivity {
private TitlePageIndicator mTitlePageIndicator; private ViewPager mViewPager;
@Override protected void onCreate(Bundle savedInstanceState) { super.onCreate(savedInstanceState); setContentView(R.layout.day14_activity_viewpager_titlepage);
mViewPager = (ViewPager) findViewById(R.id.pager); mTitlePageIndicator = (TitlePageIndicator) findViewById(R.id.titles);
SimplePagerAdapter adapter = new SimplePagerAdapter(getSupportFragmentManager()); mViewPager.setAdapter(adapter);
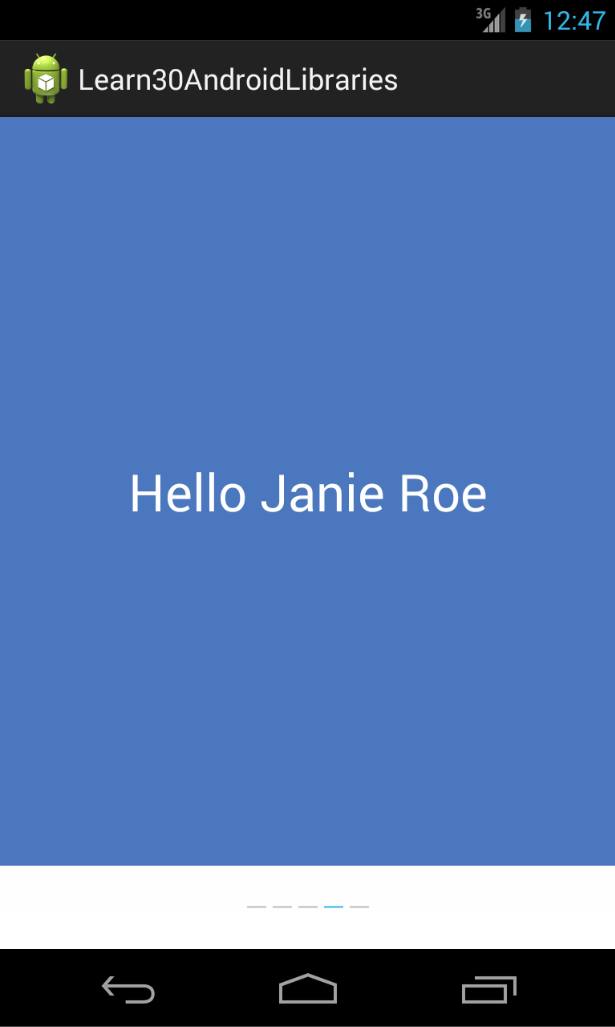
mTitlePageIndicator.setViewPager(mViewPager); }}จากด้านบน ผมทำการ binding View ปกติ จากนั้นก็ใช้ SimplePagerAdapter จากบทความที่แล้ว โดยเป็น Adapter ให้กับ ViewPager จากนั้นสุดท้าย ให้ TitlePageIndicator ทำการ setViewPager ทดสอบรันโปรแกรม ก็จะได้หน้าตาประมาณนี้

LinePageIndicator
ทำการสร้างเลเอาท์ขึ้นมาใหม่ชื่อว่า activity_viewpager_line.xml
<?xml version="1.0" encoding="utf-8"?><LinearLayout xmlns:android="http://schemas.android.com/apk/res/android" android:orientation="vertical" android:layout_width="match_parent" android:layout_height="match_parent" android:weightSum="1">
<android.support.v4.view.ViewPager android:id="@+id/pager" android:layout_width="match_parent" android:layout_height="0dp" android:layout_weight="0.9"/>
<com.viewpagerindicator.LinePageIndicator android:id="@+id/indicator" android:layout_height="0dp" android:layout_width="fill_parent" android:layout_weight="0.1" android:padding="10dp" /></LinearLayout>เลเอาท์ด้านบน คล้ายกับแบบแรก แตกต่างกันที่เปลี่ยนเป็น LinePageIndicator แล้วก็ย้ายมาอยู่ข้างล่าง ViewPager แทนครับ
ต่อมาที่ส่วนโค๊ด ViewPagerIndicatorActivity ก็แค่เปลี่ยนจาก TitlePageIndicator เป็น LinePageIndicator ส่วนอื่นคงไว้เหมือนเดิมครับ จะได้ดังนี้
package com.devahoy.learn30androidlibraries.day14;
import android.os.Bundle;import android.support.v4.view.ViewPager;import android.support.v7.app.ActionBarActivity;
import com.devahoy.learn30androidlibraries.R;import com.devahoy.learn30androidlibraries.day13.SimplePagerAdapter;import com.viewpagerindicator.LinePageIndicator;import com.viewpagerindicator.TitlePageIndicator;
public class ViewPagerIndicatorActivity extends ActionBarActivity {
private LinePageIndicator mLinePageIndicator; private ViewPager mViewPager;
@Override protected void onCreate(Bundle savedInstanceState) { super.onCreate(savedInstanceState); setContentView(R.layout.day14_activity_viewpager_line);
mViewPager = (ViewPager) findViewById(R.id.pager); mLinePageIndicator = (LinePageIndicator) findViewById(R.id.indicator);
SimplePagerAdapter adapter = new SimplePagerAdapter(getSupportFragmentManager()); mViewPager.setAdapter(adapter);
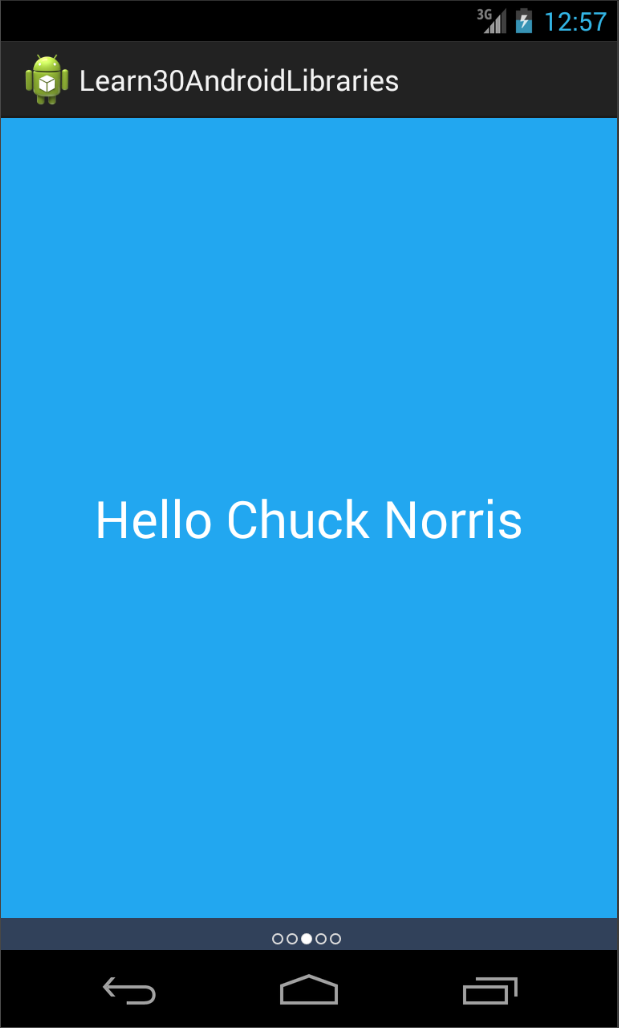
mLinePageIndicator.setViewPager(mViewPager); }}เมื่อทดสอบรันโปรแกรม จะได้ดังภาพ (ผมเปลี่ยนจำนวน Page ในคลาส SimplePagerAdapter เป็น 5)
CirclePageIndicator
ส่วนการใช้ CirclePageIndicator ก็คล้ายๆกับ ด้านบนครับ แค่เปลี่ยนจาก LinePageIndicator เป็น CirclePageIndicator แบบนี้
<?xml version="1.0" encoding="utf-8"?><RelativeLayout xmlns:android="http://schemas.android.com/apk/res/android" android:layout_width="match_parent" android:layout_height="match_parent">
<android.support.v4.view.ViewPager android:id="@+id/pager" android:layout_width="match_parent" android:layout_height="match_parent" android:layout_alignParentTop="true" android:layout_above="@+id/indicator"/>
<com.viewpagerindicator.CirclePageIndicator android:id="@+id/indicator" android:layout_height="20dp" android:layout_width="match_parent" android:layout_alignParentBottom="true" android:background="#ff31415a" android:padding="10dp" /></RelativeLayout>ด้านบน ผมเปลี่ยนไปใช้ RelativeLayout นะครับ เนื่องจาก จะให้ Circle มันสูงแค่ 20dp พอ ถ้าเป็นอัตรา ratio 1:10 แล้ว มันเยอะไป
ส่วนคลาส ViewPagerIndicatorActivity ก็เป็นแบบนี้
package com.devahoy.learn30androidlibraries.day14;
import android.os.Bundle;import android.support.v4.view.ViewPager;import android.support.v7.app.ActionBarActivity;
import com.devahoy.learn30androidlibraries.R;import com.devahoy.learn30androidlibraries.day13.SimplePagerAdapter;import com.viewpagerindicator.CirclePageIndicator;
public class ViewPagerIndicatorActivity extends ActionBarActivity {
private CirclePageIndicator mCirclePageIndicator; private ViewPager mViewPager;
@Override protected void onCreate(Bundle savedInstanceState) { super.onCreate(savedInstanceState); setContentView(R.layout.day14_activity_viewpager_circle);
mViewPager = (ViewPager) findViewById(R.id.pager);
mCirclePageIndicator = (CirclePageIndicator) findViewById(R.id.indicator);
SimplePagerAdapter adapter = new SimplePagerAdapter(getSupportFragmentManager()); mViewPager.setAdapter(adapter);
mCirclePageIndicator.setViewPager(mViewPager); }}ทดสอบ รันได้ผลลัพธ์แบบนี้
สรุป
จริงๆ แล้วบทความนี้ก็เป็นแนว ตัวอย่างซะมากกว่าครับ โดยนำเสนอเพียงแค่ 3 แบบเท่านั้น แต่ว่า ViewPagerIndicator ยังมีแบบอื่นๆให้ใช้อีกครับ ตามที่กล่าวไว้ในตอนต้นของบทความ สำหรับใครที่อยากจะลองใช้แบบอื่น ก็ไม่ยากเลยครับ วิธีการก็ทำเหมือนกับ 3 แบบที่ผมยกมาด้านบนนั้นแหละครับ เพียงแค่เปลี่ยน tag xml, ในคลาส ก็ทำการกำหนดคลาส PageIndicator ให้ตรงกันกับที่ประกาศไว้ในเลเอาท์ซะ แล้วก็ setViewPager() ปกติครับ สำหรับบทความนี้ขอจบเพียงเท่านี้ครับ
Happy Coding :D
Source Code
References
- Authors
-

Chai Phonbopit
เป็น Web Dev ในบริษัทแห่งหนึ่ง ทำงานมา 10 ปีกว่าๆ ด้วยภาษาและเทคโนโลยี เช่น JavaScript, Node.js, React, Vue และปัจจุบันกำลังสนใจในเรื่องของ Blockchain และ Crypto กำลังหัดเรียนภาษา Rust


